Emailing File Attachments from Forms with Power Automate

Forms FlowI’ve seen some questions recently on the Power Platform Forums about how to send multiple attachments submitted in Microsoft Forms in an email.  Since this seems to be a common problem I thought it would be good to walk through the steps in a BLOG post.

  1. Once you have a Microsoft Form created that includes a question with an attachment you can create a new Power Automate Flow that uses the “When a new response is submitted” trigger.  That will start your flow each time a response is submitted through Microsoft Forms. But the trigger alone won’t provide enough detail about what is in the response.  So you also need to add a “Get response details” action to retrieve the questions and the answers submitted in the form.
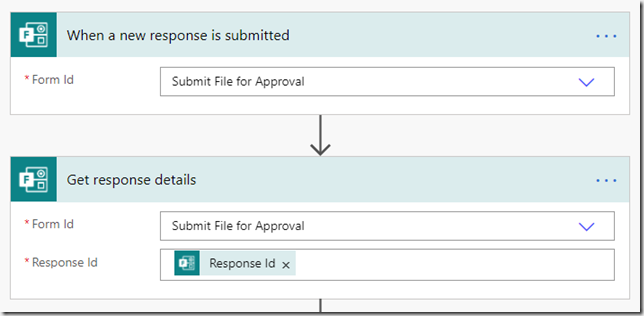
    Get Form Details
  2. In order to submit more than one file attachment to the email you will need to create an array to hold the name and content of each file.  To do this we “Initialize a variable” of type array.  We will supply values for the array later in an “Apply to each” loop.
    InitFileArray
  3. Now you are ready to retrieve the details of the files attached to the question in the response and add them to the array.  To do that you need to use “Parse JSON” to parse the contents of the question in the response where the files were uploaded. Run your flow once at this point to get some sample output that you can use to generate the JSON schema.  Then add your question content to the Parse JSON.
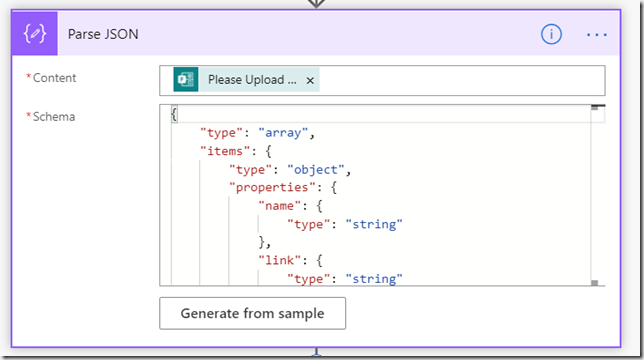
    parsejson
  4. Files uploaded to a Microsoft Form are automatically stored in the Form creator’s OneDrive for Business account.  So now that we have access to the details of those files from the Parse JSON action we can retrieve the file content from OneDrive and append it to the Array we created in Step #2.  We’ll use the file id to retrieve the file and then add the Name of the file and the File content to the array. Whether there is one file or multiple files the details will be in an array, so we’ll need to use an “Apply to each” loop to get each file and append it. The File content can ge used directly as we retrieve it from OneDrive.  No translation to Base64 is required because the file is retrieved as JSON, not binary.
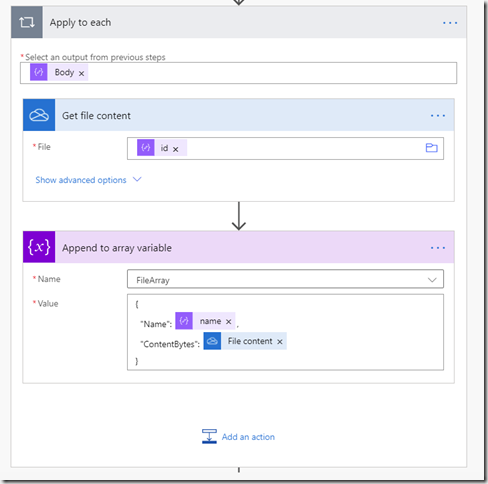
    AppendToArray
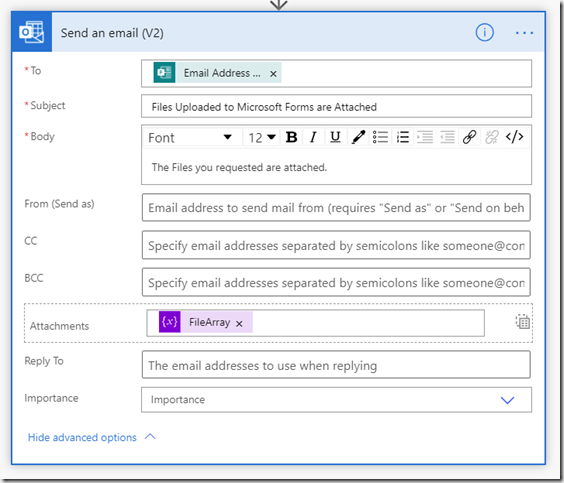
  5. Now that we have the file content in an array we can send the email.  Be sure to click on the selector in the attachments section to switch from detail inputs to an array item.  Then just fill out the email and add the array variable to the Attachments field.
    SendEmailAttachments

Now you can save and test your flow by filling out the Microsoft Form and uploading one or more attachments to the form.  In under 5 minutes you should get an email with the attachments from the form.

13th Year as an MVP

mvp13July 1st is always a day that I both look forward to and dread.  That’s the morning I find out whether my MVP status has been renewed or not. I really started worrying this year when I saw lots of my friends and colleagues announce their re-awards at a little after 11:00 AM Eastern time.  By noon I was convinced that I had not been re-awarded. The one piece of hope that I tried to hold onto was that MS said they would send emails to all MVPs with the re-award decision whether they were re-awarded or not. With a sigh of relief I finally got my email around 12:30 Eastern time.  I’m not sure why my email was later than it has been in previous years, but it was a reminder to me how much I value being an MVP. I am particularly honored and grateful for Microsoft’s continued recognition this year.

But now its time to plan for the new year.  The Covid-19 pandemic has really cut into my time speaking at conferences, since most conferences have been cancelled or postponed.  But I have spoken at a couple virtual conferences this spring and as fall approaches it looks like I will have a busy schedule speaking at conferences that were postponed from earlier this year.

Over the last year I’ve been spending a lot more time working with Power Apps and Power Automate, particularly as it applies to SharePoint and Teams.  In addition to being re-awarded as an MVP I’ve also been named a Dual Super User in the Power Apps and Power Automate community forums. With the announcement last week that SharePoint workflows are going away these two areas will become even more important for working with SharePoint online.

So here’s to another year as an MVP. I’m really looking forward to it.

Approve a File Uploaded via Microsoft Forms

formApprova;I was asked recently if it was possible to upload a file via a Microsoft Form and then use Power Automate Approvals to Approve the file. The answer of course is YES, but that doesn’t answer the question of HOW? So in this POST I will walk through a simple example showing how this can be done.

Step #1 – Upload the file using Microsoft Forms

The first step is to create a Microsoft Form that can be used to upload a file.  There are two possibilities here.  First, if you are creating the Form personally then the file will be stored in your OneDrive. But if you are creating the Form as part of an Office 365 Group then the file will be stored in the SharePoint site that was created when the group was created. Either way the file is placed in a subdirectory called ‘/Apps/Microsoft Forms/{Name of the Form}/Question/’.  This makes it easy to find the file if you are uploading files from multiple forms. The file will also be uniquely named by adding the name of the submitter to the end of the original file name.

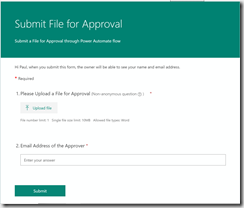
For our purposes I created a simple MS Form that had two questions.  The first lets the responder upload a file.  MS Forms has a specific question type that adds an attachment control to the form. Setting optional properties on the attachment control can also be used to limit the file extensions that can be uploaded, the maximum file size, and the maximum number of files. The second question is a text question used for the user to submit the email address of the person who is going to approve the file. Here’s a screenshot of the form I created.

Form

Step #2 – Create an Approval flow

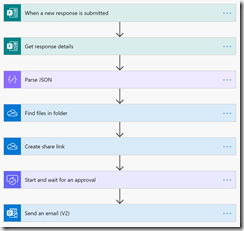
Now that we’ve used MS Forms to submit the file lets create a Power Automate flow to approve the file. Here’s a screenshot of the completed flow.  We’ll come back and examine each action.

Flow 

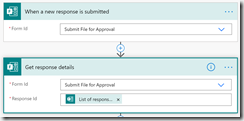
The flow is triggered when a new response is submitted to MS Forms. Unfortunately, the trigger doesn’t contain dynamic content that includes all the responses.  So we have to follow the trigger with a Get Response Details action to get the responder’s email address, the approver’s email address and the name of the file that was uploaded.  Here are the details for the MS Forms trigger and actions we are using. For the trigger the only parameter you need is to pick the form that you used to upload the file. Then get the details by picking the form and supplying the ID of the response returned by the trigger.

FormsActions

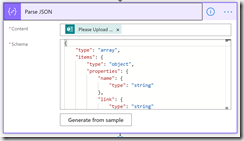
Once you’ve gotten the details from the form you need to isolate the Id of the file that was uploaded so you can share it with the Approver. The easiest way to do that is to Parse the JSON response from the Form response details. The trick here is to run the flow once before adding the Parse JSON action so you can get a sample output to use to generate the schema. Here’s a screenshot of the Parse JSON action.

parseJSON

Now that we have access to the Id for the file we can use that to create a sharing link to use in our approval so the approver can access the file.  However, even though we limited the Form upload to only one file it will return the file information as a collection.  So we’ll use a First() function to get the one record out of the collection to use with the Create a Share Link action. The formula to feed into the File parameter is ‘first(body(‘Parse_JSON’))?[‘id’]’. We set the action to provide a Link that is available to an anonymous user and provides only View permission.

CreateShareLink 

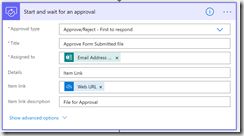
Now that we have the link we can create the Approval.  We fill out the Approval action as shown in the screenshot below with the email of the Approver from the Form response and the sharing link we generated above.

approval

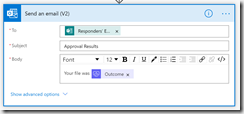
Once the Approver responds to the Approval we can complete the flow by sending an email back to the person who filled out the original Form with whatever details we want to supply.   The Send an Email V2 action uses the Responder’s email from the original Form Details action at the start of the flow.

email

That completes this walkthrough.  This should provide enough detail to get you started if you want to approve a file uploaded via an MS Form.

Microsoft Flow Virtual Summit – Demos

collab365-virtual-summitsToday was the first day of the Microsoft Flow Virtual Summit sponsored by Collab 365. I really enjoyed being able to sit back and watch my recorded session and spend my time answering questions from the attendees. The comments I got in the chat window were all very gracious and complimentary. It didn’t take long during the session for people to start asking if I would make my demos available after the session. I promised that I would export all seven and post them here on my blog and also send them to the Collab 365 folks to be posted on the Summit site. The demos have all been exported and sent via email to Collab 365.  Now I just need to upload them and post them here:

  1. Applying custom formatting to the approval email
  2. Recording approval results and comments
  3. Creating custom responses without premium licensing
  4. Forwarding an approval if the approver is out of the office
  5. Escalating an approval that hasn’t been responded to
  6. Periodic reminders about pending approvals
  7. Serial Approvals with dynamic list of approvers

NACS 2019 – Wrap up and Slides

The North American Collaboration Summit (NACS) concluded last weekend in Branson, MO. This is one of the great small SharePoint conferences in the US and I always look forward to attending. It fell again this year on the weekend before the MVP Summit in Redmond at Microsoft, so travel arrangements were complex.  But it was well worth the effort. Most of my sessions were well attended and the one highly technical session that had a low turnout probably had the highest interest from the attendees who were there.  It was a pleasure to feel that I was sharing information that people really wanted to learn about.  It was also great to spend time with a number of long time friends who were also presenting.

I promised to make my slides available, so I’ve uploaded them here.  Sorry for the delay, but getting anything extra accomplished while at the MVP Summit is almost impossible. If you have any follow-up questions please email me at pstork@dontpapanic.com.  You can download a copy of the slides from each talk using the links below:

Intro to SharePoint 2019: What’s New

Desired State Configuration (DSC): Controlling SharePoint Deployment in Azure VMs

Intro To OneDrive NextGen Sync: What is it, how it works, and can I manage it?