Renewed as an MVP for 14 years

July 1st came and went this year with a lot less uncertainty and dread. That’s because this year all MVPs were renewed for another year due to the lowered opportunities available during the pandemic. But even if I didn’t worry about it as much this year I was still just as excited to get the official notice that my MVP status has officially been re-awarded for the 14th year. I continue to feel honored and grateful for Microsoft’s recognition of my contributions to the community for another year.

But now its time to plan for the new year.  The Covid-19 pandemic shut down all in-person speaking events for almost 18 months  I have spoken at a couple virtual conferences last year, but I’m looking forward to in-person events starting up again later this summer. I’ll be traveling to Chicago to present at SPFest in a few weeks with two additional events later this fall.

Over the last year I’ve been spending a lot more time working with Power Apps and Power Automate, particularly as it applies to SharePoint and Teams.  In addition to being re-awarded as an MVP I continue as a Dual Super User in the Power Apps and Power Automate community forums. With the announcement last fall that SharePoint workflows are going away these two areas will become even more important for working with SharePoint online.

So here’s to another year as an MVP. I’m really looking forward to it.

13th Year as an MVP

mvp13July 1st is always a day that I both look forward to and dread.  That’s the morning I find out whether my MVP status has been renewed or not. I really started worrying this year when I saw lots of my friends and colleagues announce their re-awards at a little after 11:00 AM Eastern time.  By noon I was convinced that I had not been re-awarded. The one piece of hope that I tried to hold onto was that MS said they would send emails to all MVPs with the re-award decision whether they were re-awarded or not. With a sigh of relief I finally got my email around 12:30 Eastern time.  I’m not sure why my email was later than it has been in previous years, but it was a reminder to me how much I value being an MVP. I am particularly honored and grateful for Microsoft’s continued recognition this year.

But now its time to plan for the new year.  The Covid-19 pandemic has really cut into my time speaking at conferences, since most conferences have been cancelled or postponed.  But I have spoken at a couple virtual conferences this spring and as fall approaches it looks like I will have a busy schedule speaking at conferences that were postponed from earlier this year.

Over the last year I’ve been spending a lot more time working with Power Apps and Power Automate, particularly as it applies to SharePoint and Teams.  In addition to being re-awarded as an MVP I’ve also been named a Dual Super User in the Power Apps and Power Automate community forums. With the announcement last week that SharePoint workflows are going away these two areas will become even more important for working with SharePoint online.

So here’s to another year as an MVP. I’m really looking forward to it.

Approve a File Uploaded via Microsoft Forms

formApprova;I was asked recently if it was possible to upload a file via a Microsoft Form and then use Power Automate Approvals to Approve the file. The answer of course is YES, but that doesn’t answer the question of HOW? So in this POST I will walk through a simple example showing how this can be done.

Step #1 – Upload the file using Microsoft Forms

The first step is to create a Microsoft Form that can be used to upload a file.  There are two possibilities here.  First, if you are creating the Form personally then the file will be stored in your OneDrive. But if you are creating the Form as part of an Office 365 Group then the file will be stored in the SharePoint site that was created when the group was created. Either way the file is placed in a subdirectory called ‘/Apps/Microsoft Forms/{Name of the Form}/Question/’.  This makes it easy to find the file if you are uploading files from multiple forms. The file will also be uniquely named by adding the name of the submitter to the end of the original file name.

For our purposes I created a simple MS Form that had two questions.  The first lets the responder upload a file.  MS Forms has a specific question type that adds an attachment control to the form. Setting optional properties on the attachment control can also be used to limit the file extensions that can be uploaded, the maximum file size, and the maximum number of files. The second question is a text question used for the user to submit the email address of the person who is going to approve the file. Here’s a screenshot of the form I created.
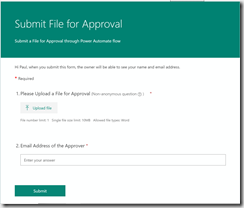
Form

Step #2 – Create an Approval flow

Now that we’ve used MS Forms to submit the file lets create a Power Automate flow to approve the file. Here’s a screenshot of the completed flow.  We’ll come back and examine each action.
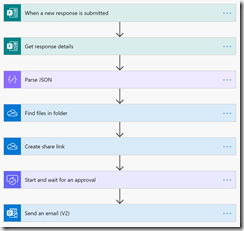
Flow 

The flow is triggered when a new response is submitted to MS Forms. Unfortunately, the trigger doesn’t contain dynamic content that includes all the responses.  So we have to follow the trigger with a Get Response Details action to get the responder’s email address, the approver’s email address and the name of the file that was uploaded.  Here are the details for the MS Forms trigger and actions we are using. For the trigger the only parameter you need is to pick the form that you used to upload the file. Then get the details by picking the form and supplying the ID of the response returned by the trigger.
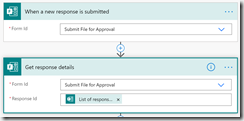
FormsActions

Once you’ve gotten the details from the form you need to isolate the Id of the file that was uploaded so you can share it with the Approver. The easiest way to do that is to Parse the JSON response from the Form response details. The trick here is to run the flow once before adding the Parse JSON action so you can get a sample output to use to generate the schema. Here’s a screenshot of the Parse JSON action.
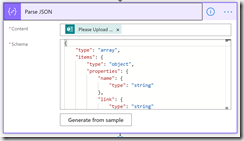
parseJSON

Now that we have access to the Id for the file we can use that to create a sharing link to use in our approval so the approver can access the file.  However, even though we limited the Form upload to only one file it will return the file information as a collection.  So we’ll use a First() function to get the one record out of the collection to use with the Create a Share Link action. The formula to feed into the File parameter is ‘first(body(‘Parse_JSON’))?[‘id’]’. We set the action to provide a Link that is available to an anonymous user and provides only View permission.

CreateShareLink 

Now that we have the link we can create the Approval.  We fill out the Approval action as shown in the screenshot below with the email of the Approver from the Form response and the sharing link we generated above.
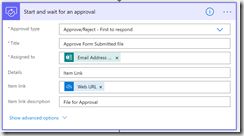
approval

Once the Approver responds to the Approval we can complete the flow by sending an email back to the person who filled out the original Form with whatever details we want to supply.   The Send an Email V2 action uses the Responder’s email from the original Form Details action at the start of the flow.
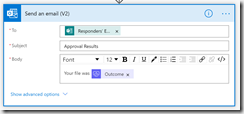
email

That completes this walkthrough.  This should provide enough detail to get you started if you want to approve a file uploaded via an MS Form.

12 years as an MVP

July 1st is always a day that I both look forward to and dread.  That’s the morning I find out whether my MVP status has been renewed or not. I was particularly worried this year since its my first year after I semi-retired. I’m still working as a consultant, but I’m letting business chase me rather than me chasing business.  So I’m not as busy as I used to be. That’s been both a good and a bad thing. Its a good thing because I have more time to spend with my family and doing things for the Office 365 community. Its a bad thing because I don’t feel like I’m doing as much as in previous years. But I have evidently been doing enough because I was renewed for my 12th year as an MVP this year. I’m looking forward to another year of learning new things and helping spread that knowledge throughout the community.

Last year as I contemplated retirement I made an offer to community leaders.  I would like to expand on that offer this year.

Community Leaders this is for YOU

If you are looking for a SharePoint, Office 365, PowerApps or Flow speaker for your event, and you can help me defray travel expenses, I will be willing to travel almost anywhere, at anytime to share what I have learned over the years. If you don’t have any funds I can also do remote presentations.

Over the last few years I’ve been spending my time working with SharePoint, PowerApps, Flow, and Office 365 Security & Compliance center.  I’m still working to learn new things in the industry and plan to keep  consulting and training for many years to come.  But if paying jobs don’t happen to come my way then I’ll live off my retirement savings and spend even more time speaking and answering questions.

So here’s to another year as an MVP. I’m really looking forward to it.

Filter on a Boolean in PowerApps

PowerappsOne of the spots where I see a lot of people being challenged when they first learn PowerApps is the concept of delegation. Delegation comes into play when working with data sources larger than 500 records. By default PowerApps is designed to only work on a maximum of 500 records at a time. You can increase this default setting to a maximum of 2,000, but that usually results in a noticeable performance lag in your PowerApp. To avoid that problem you should always limit the number of records you are retrieving from a data source to 500 records or less. One of the most common ways to do that is by using the Filter() function to limit the records being returned by the data source to a specific subset that you want to work on.

Using Filter() to limit the number of records retrieved from a specific data source is a great strategy, but it doesn’t always work. This is where understanding the concept of delegation becomes critical. Delegation is the process of having the data source filter the records before they are returned to the PowerApp instead of having the PowerApp apply the filter directly. This is complicated by the fact that not all data sources support delegation and different data sources support different logical operators for delegation. You can find a list of delegable data sources and operators here: https://docs.microsoft.com/en-us/powerapps/maker/canvas-apps/delegation-list. But even this documentation can lead to confusion.

The confusion comes in from some footnotes in the ‘Filter and LookUp delegable predicates’ section of the documentation. Footnote 3 on the logical operators reads, “For numeric columns, all operators can be delegated. For ID columns, only the ‘=’ can be delegated. Date columns can’t be delegated.” This would imply that all the operators should work with a Boolean value of true or false. But in my experience Boolean columns are treated the same way that ID columns are treated. The only operator that works is ‘=’. If you try to use a Filter statement where a Boolean value is not equal to something you will see that it issues a delegation warning. The following screenshot shows an example.

PowerApps1Blog

But if I change the formula to the Boolean being equal to true then the delegation warning goes away and the function becomes delegable. See the screenshot below.

PowerApps2Blog

The moral of the story is that understanding the intricacies of delegation is critical when building PowerApps.