Send One Email per Person in a Mixed List

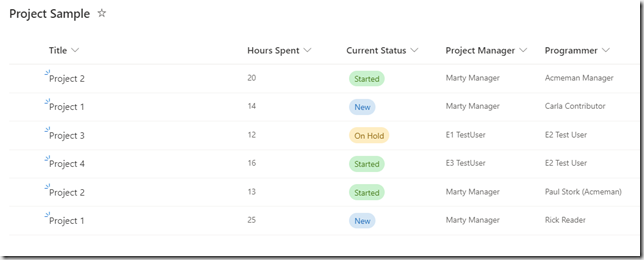
apply to eachOne of the most common questions I see on the Power Platform forums is: “I have a data source that contains a list of information that I need to send as an HTML table to the individual mentioned in each item. But its sending more than one email to each person.  How do I get it to send just one email for each person with all the records for that person?”  In this post I’ll demonstrate a general method to accomplish that goal using Power Automate. For this example we’ll use a simple list from SharePoint, but the same technique should work for any data source that can be sorted.  Here’s our list:

list

We want to send a table with the hours spent by each programmer and their current status to each Project Manager.

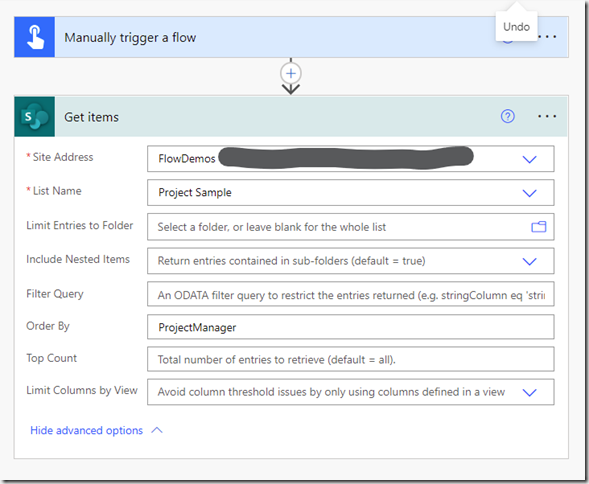
Step#1 – Retrieve the records from data source.  Sort them based on the field that references the person, in this case Project Manager. This will not work if the field includes multiple people. Here’s a screenshot of that part of the flow.

list1

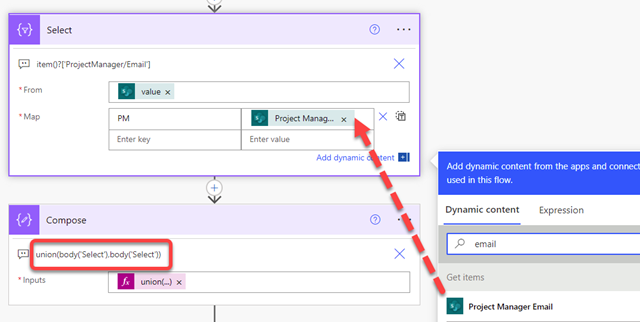
Step#2 – The next step is to get a list of the distinct project managers in the results we have retrieved.  Unfortunately, Power Automate doesn’t have a Distinct() function.  But we can achieve the same result using a combination of a Data Select action and the Union() function. When we combine the Data Select array with itself using Union() we will get an array that has a single instance of each unique record in the Data Select array. In this case a list of each Project Manager’s Email address.

Distinct1

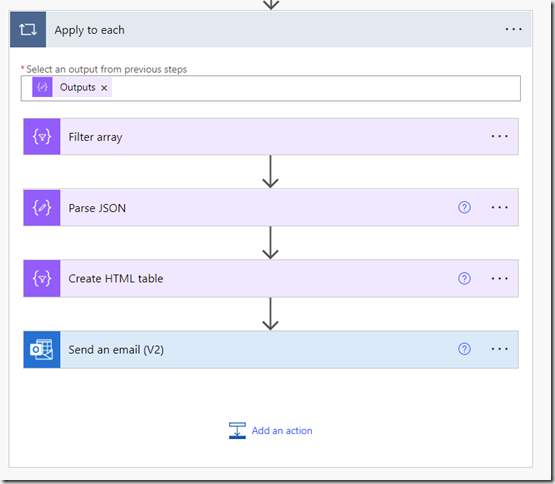
Step#3 – Now that we have an array of distinct Project Manager Emails we can run an Apply to Each loop on each Email, extract the records for that manager, create a table and send the email. Here’s what the overall Loop looks like then we’ll review each step. The loop runs on the array produced by the union in the last Compose action.

loop 1

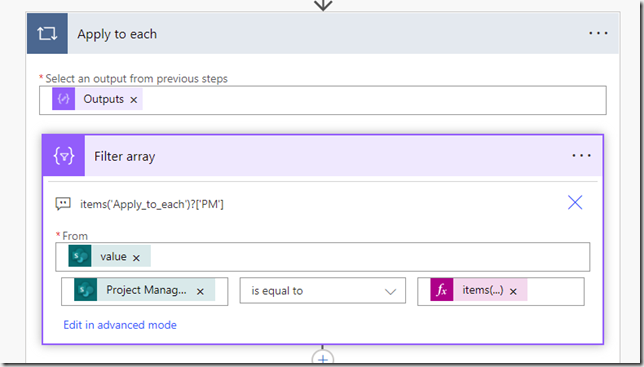
Loop Step #1 – The first thing we do inside the loop is filter the original set of records to create an array of records where the Project Manager’s Email in the record matches the current item’s email.  Since we stored the email as a record using the data select we need to retrieve it using JSON notation in the Expressions tab.  The JSON will be for the current loop item ‘PM’ property.  items(‘Apply_to_each’)?[‘PM’]

apply1

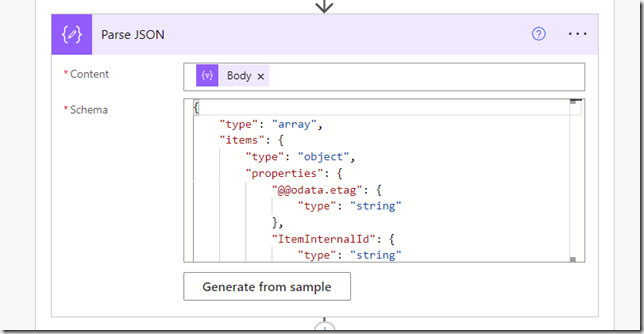
Loop Step#2 – Now that we have the records for one of the Project Managers we need to turn them into a table. First we need to use Parse JSON to re-apply a schema to the filtered records so we can access individual columns.  We parse the Body output of the filter array action. Run the flow once after adding the Parse JSON and use the output from the filter array to generate a JSON schema.

apply2

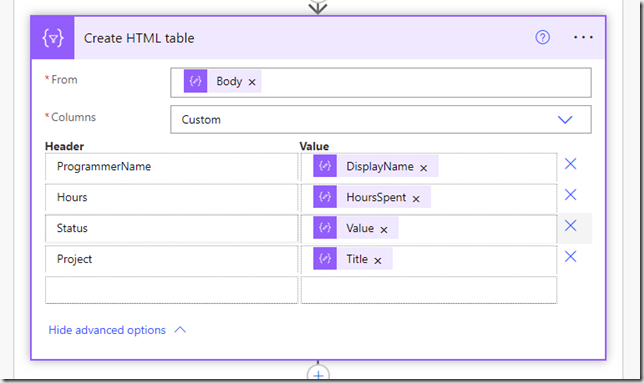
Loop Step#3 – Now we are ready to create the HTML table to embed in the email. Use the Create HTML Table set for custom and map the columns you want in the table from the Parse JSON output. I used the programmer’s displayName, Hours, Status, and Project columns. You may have multiple columns with the same name, like DisplayName.  These represent the embedded properties in objects.  For example the DisplayName might be for the Project Manager, the Programmer, or the person who created the item in the list. You can tell which one you added by hovering over the column and looking at the JSON.

apply3

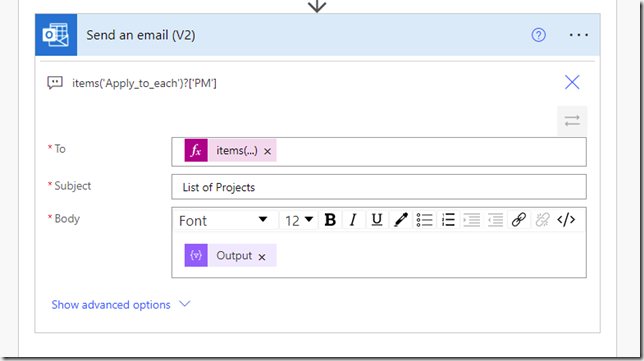
Loop Step#4 – The last step in the loop is to send the email. Use the same JSON that you used to filter the array in Loop Step#1, since that is the email address of the Project manager. Fill out the subject and Body of the email with whatever information you want, including the HTML table you just created.

Apply4

That’s all you need.  The loop will now process each Person in the list and send one email to each with the correct information. I’m sure your list will be different, but the steps should be essentially the same.

Running a Recurrence Flow on Weekdays Only

RecurrenceRecurrence Triggers are essential for a wide variety of scenarios.  They can be used to run a flow on a specific date and time.  Or they can be used to run a flow on a recurring schedule, like once a day or once a month.  They can even be used in situations where  a process needs to run longer than the 30 day timeout limit on flows.

But what if your recurring schedule has exceptions.  For example, you might want to run it on the first Monday of each month or only on weekdays.  How can we use the recurrence trigger to handle these more complicated scenarios?

One possible solution is to trigger the flow on a simple schedule, like daily, and then test to see if its the right day.  If it is proceed with the flow, but if its not just exit.  This does work, but it consumes a lot of flow runs that are unnecessary.  Not only is this inefficient it may cause an issue with the limits on API calls in a 24 hour period.  It would be much better if we could take these conditions into account BEFORE the flow triggers.  But we can’t always reach that level of granularity in the trigger configuration itself. But we can if we use the trigger conditions available under settings.

Let’s look at a specific scenario.  I want this flow to trigger on each workday of the month. I start out by creating a flow with a trigger set to fire once a day.  This will create a flow that runs everyday of the month.  So far the trigger will look like this.

RecurrenceTrigger

Next I need an appropriate filter that will limit the trigger to only fire on Monday thru Friday.  If you aren’t familiar with how to write that filter I suggest using a ‘Filter array’ action to put it together.  After adding a ‘Filter array’ action to your flow fill in the left side of the comparison with the following formula:

dayOfWeek(utcNow())

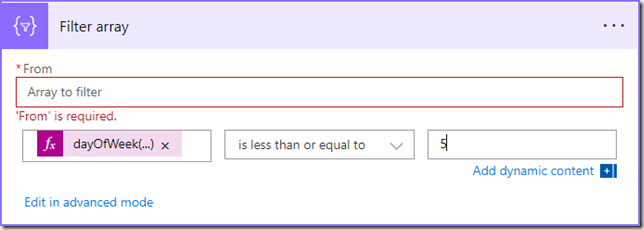
That will take the current date and convert it to a number for the day of the week.  Monday = 1, Tuesday = 2, etc. Now finish the condition by choosing ‘is less than or equal to’ in the middle and enter ‘5’ on the right.  We haven’t filled in the Array to filter, but since all we want is the formula that’s OK.  We’ll be deleting this action after we copy the formula.  Your action should now look like this.

filter array

Now comes the trick that makes this worthwhile.  Click on the ‘Edit in advanced mode’ link. The action will now look like the following.

filter array advanced

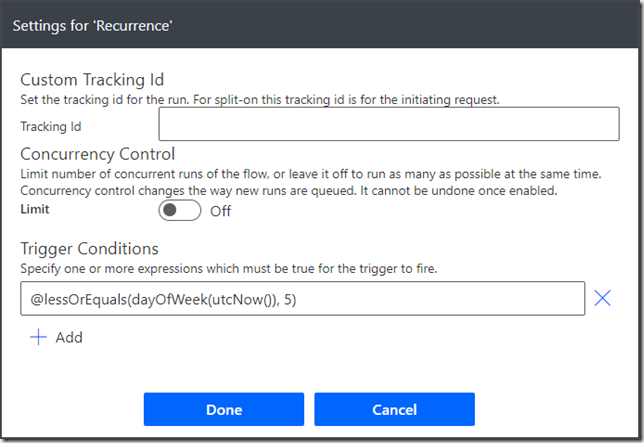
The formula we need is the one highlighted in yellow.  Copy that formula to your clipboard and delete the ‘Filter array’ action.  Our finished flow doesn’t actually use it.  Now open the settings dialog for the recurrence trigger using the ellipses (…) menu on the trigger. Click the + Add link under Trigger Conditions and paste the formula you copied into the textbox that appears.  Your Settings should now look like this.

Settings

You can now click Done and your flow trigger each day if it is a Monday through Friday.  It will not trigger on Saturday, day 6, or Sunday, day 7. Using trigger conditions you can fine tune the schedule of your recurrence trigger to only fire when you want it to.

Excel Date changes in Power Automate

Excel2flowSometime around January 15, 2021 a change was made to the List Rows action in the Excel Online (Business) connector that stopped bringing dates in as Serial dates and started bringing them in as ISO 8601 formatted strings.    If you have existing flows that were written prior to January 15th there is a good chance that this change will break your flow. This blog will explain the background behind Serial dates in Excel, explain what you can expect going forward for Excel fields formatted as dates, and provide some helpful formulas that will let you convert dates if necessary.

Edit: This change was due to a regression bug.  Microsoft rolled it back on 1/21/2021. Explanation from the support site below
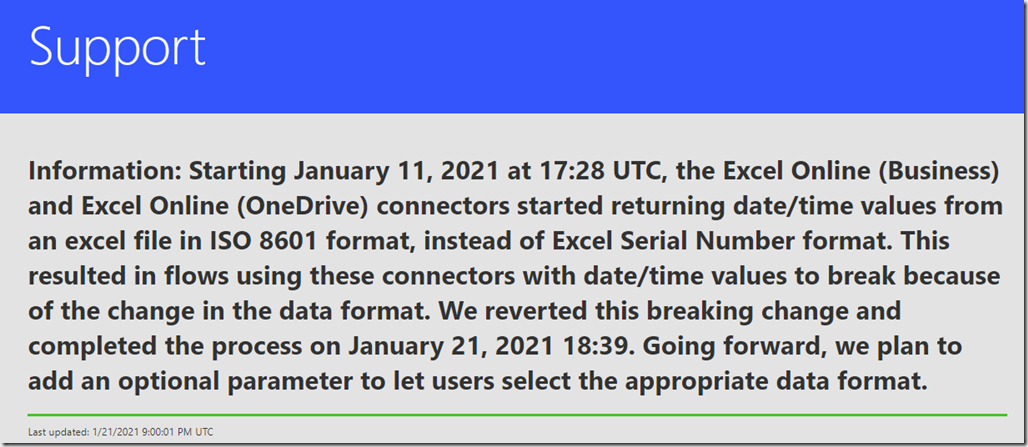
Flow Support

Serial Dates Explained

Let’s start with a little background.  Cells in an Excel Table that are formatted as Long Date, Short Date, Time, or with one of the Custom time and date formats store their values as a Serial Date. Serial dates represent the number of days (and fractional days) that have passed since January 1, 1900. The time portion is stored as a fraction between 0.0 and 0.99999, where:

  • 0.0 is midnight 00:00:00 (hours:minutes:seconds)
  • 0.5 is noon 12:00:00 (12 p.m.)
  • 0.99999 is 23:59:59

Note: For calculation purposes we’ve always used 12/30/1899. This is because January 1 = 1 so the 0 day is actually 12/31/1899. We have to subtract one more because 1900 didn’t have a February 29th for leap year and the formula assumes that it did. So for calculations you are off by 2 days automatically.

In the past Dates, Times, and custom formatted dates where brought into Power Automate from Excel using a List Rows action as the actual serial date stored in Excel. If you look at the example below you can see the serial dates in the JSON.
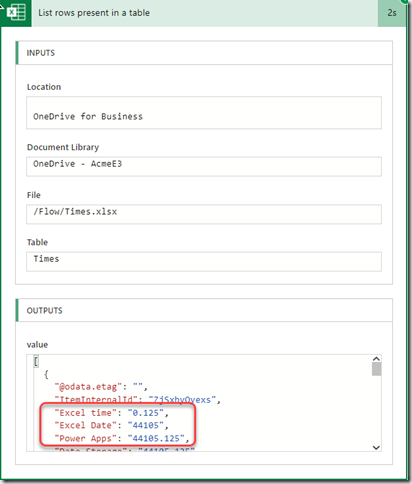
serialDates

New Excel Online List Rows Behavior

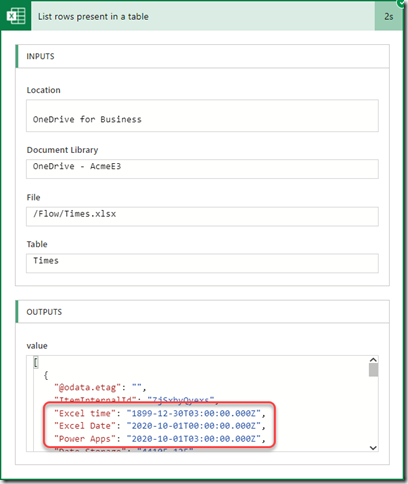
The List Rows action in the Excel Online connector now brings Dates, Times, and custom formatted dates into Power Automate formatted as ISO 8601 Dates. Here’s a screenshot of the previous List rows action when I ran it today.
TimeDateISO

As you can see the dates are now listed in a format that is directly readable without doing extensive calculations.  Since Excel reports Dates and Times in a time zone neutral format all Dates and Times are considered Universal Time Code (UTC) for ISO 8601. This explains the ‘”Z” at the end. But whether the cell was formatted as Time only, Date only or a custom Date and Time field it is now translated to a full DateTime value.  The 3 fields in the screenshot represent the 3 different possibilities when retrieving Date time cells from Excel.

  • “Excel time” is a cell formatted as Time only so the time is reported accurately but the date defaults to 12/30/1899. See the note above for an explanation of why this is the zero date.
  • “Excel Date” is a cell formatted as Date only so the date reads normally, but the time defaults to midnight in UTC.
  • “Power Apps” is a cell formatted using a custom Date Time format in excel of “m/d/yyy h:mm”.

ISO 8601 Date Time Format Explained

ISO 8601  is an international standard used to represent date and time related data in an format that can be used to transfer it between applications. It is maintained by the Geneva-based International Organization for Standardization (ISO) and was first published in 1988. The purpose of this standard is to provide an unambiguous and well-defined method of representing dates and times, so as to avoid misinterpretation of numeric representations of dates and times, particularly when data is transferred between countries with different conventions for writing numeric dates and times. The combined Time and Date use the following pattern “YYYY-MM-DDTHH:MM:SS:xxxZ

  • YYYY is the 4 digit year to avoid a year 2000 issue
  • MM is the 2 digit month
  • DD is the 2 digit day
  • T denotes the seperation of the Date portion from the Time portion
  • HH is the 2 digit hour in 24 hours 0-23
  • MM is the 2 digit minute 0-59
  • SS is the 2 digit second 0-59
  • xxx is the fractional seconds
  • Z specifies that the Time/Date is in the UTC time zone

What this means going forward

The good news is that this means you don’t have to use a long formula to get the datetime field into a date format.  The bad news is that you no longer get a number that is easy to use in calculations.  Here are some simple formulas and actions you can use to work with the new ISO 8601 formats in Power Automate.

Converting ISO8601 to a Serial Date

This first formula will be useful if you need the datetime from Excel as an actual Serial Date value.  Let’s look at the formula working from the inside out.

div(add(div(float(ticks(‘ExcelDateField’)),10000000),-59926435200),86400)

  • ticks(IsoDate) converts the ISO 8601 date to the number of thousandths of a second since 01-01-1900
  • float(value) makes sure the result is treated as a floating decimal point number for future computations
  • div(value,10000000) there are 10,000,000 thousandths of a second in a minute. So dividing by 10 million gives us the number of seconds since 01-01-1900
  • add(value,-59926435200). There are 59,926,435,200 seconds from 01-10-1900 to to 12-30-1899. So subtracting that gives us the number of seconds from 12-30-1899 to the date
  • div(value,86400) There are 86,400 seconds in a day.  So dividing by 86,400 gives us the days with the fractional days since 12-30-1899.  This is the same value as the serial date in Excel.

Converting from UTC to local time

One of the problems that arise in the new formatting is that the Serial date in Excel is time zone independent.  There is no time zone implied or stored with the date time. But Power Automate stores all DateTimes as UTC. So when a time independent value is imported it is assumed to be UTC and is displayed that way in the the ISO 8601 format.

This means that dates can shift based on the local time zone if your flow doesn’t account for the time zone shift.  For example, if I enter a date of 2021-01-15 8:00PM in an Excel spreadsheet directly and then try to use it in a local flow to schedule a meeting then the meeting will be scheduled for 2021-01-14 2:00 AM since I live in the Central US time zone which is currently 6 hours behind UTC. This becomes even more complex when you realize that as soon as Daylight Savings time hits I’ll be 7 hours behind. So you have to be very careful to shift the time zone to take those things into account.

There is unfortunately no way to tell a flow to treat the DateTime value in a time zone independent fashion.  There are a number of functions and actions that make it easy to convert from one time zone to another.  But this won’t help in the example above because converting the date from UTC to a local time zone will change the actual date and time.  Instead you have to adjust for the time zone offset yourself before converting to the local time zone. If you know what the time zone offset is you can easily use the following formula to adjust the UTC time to be what it should be when converted to the local time zone.

convertFromUtc(addhours(ExcelDateTime,timezoneoffset, ‘o’), ‘localtimezone‘)

Where

  • ExcelDateTime is the UTC time imported from Excel
  • timezoneoffset is the number of hours difference between the local time zone and UTC. Note: this will vary depending on whether Daylight Savings time is in effect or not.
  • localtimezone is the name of the local time you wish to convert to

In my case the timezoneoffset is 5 hours currently because my time zone is 5 hours behind UTC.  So if the DateTime from Excel is 2020-10-01T03:00:00.000Z then the converted value after the formula will be 2020-10-01T03:00:00.0000000 in Central Standard Time.

Conclusion

Hopefully this post has provided the information you need to adapt your Power Automate flows to the new connector settings. In general this change should make working with Dates and Times easier.  But it will break existing flows until provisions are made for the new format.

Emailing File Attachments from Forms with Power Automate

Forms FlowI’ve seen some questions recently on the Power Platform Forums about how to send multiple attachments submitted in Microsoft Forms in an email.  Since this seems to be a common problem I thought it would be good to walk through the steps in a BLOG post.

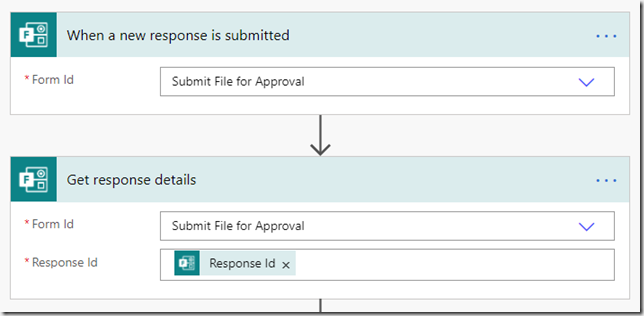
  1. Once you have a Microsoft Form created that includes a question with an attachment you can create a new Power Automate Flow that uses the “When a new response is submitted” trigger.  That will start your flow each time a response is submitted through Microsoft Forms. But the trigger alone won’t provide enough detail about what is in the response.  So you also need to add a “Get response details” action to retrieve the questions and the answers submitted in the form.
    Get Form Details
  2. In order to submit more than one file attachment to the email you will need to create an array to hold the name and content of each file.  To do this we “Initialize a variable” of type array.  We will supply values for the array later in an “Apply to each” loop.
    InitFileArray
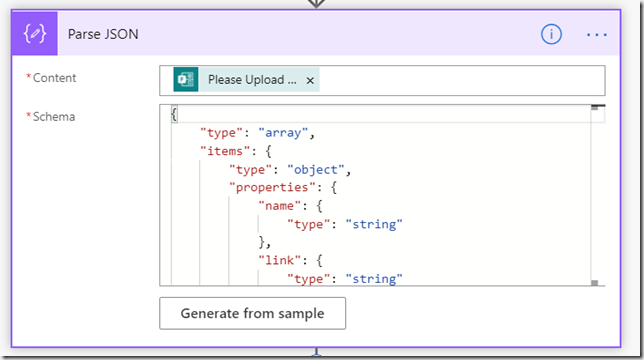
  3. Now you are ready to retrieve the details of the files attached to the question in the response and add them to the array.  To do that you need to use “Parse JSON” to parse the contents of the question in the response where the files were uploaded. Run your flow once at this point to get some sample output that you can use to generate the JSON schema.  Then add your question content to the Parse JSON.
    parsejson
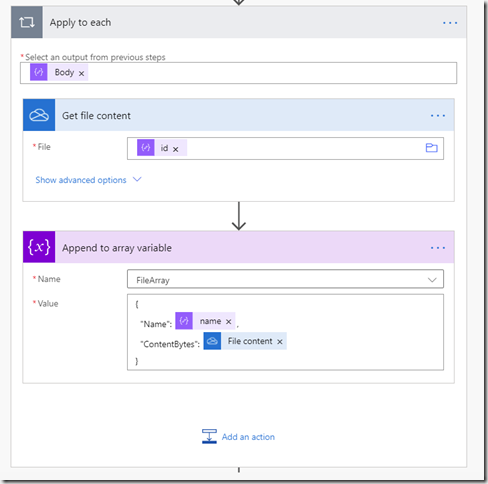
  4. Files uploaded to a Microsoft Form are automatically stored in the Form creator’s OneDrive for Business account.  So now that we have access to the details of those files from the Parse JSON action we can retrieve the file content from OneDrive and append it to the Array we created in Step #2.  We’ll use the file id to retrieve the file and then add the Name of the file and the File content to the array. Whether there is one file or multiple files the details will be in an array, so we’ll need to use an “Apply to each” loop to get each file and append it. The File content can ge used directly as we retrieve it from OneDrive.  No translation to Base64 is required because the file is retrieved as JSON, not binary.
    AppendToArray
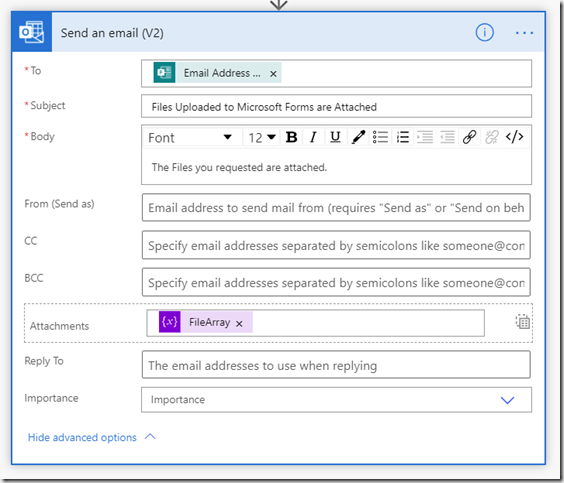
  5. Now that we have the file content in an array we can send the email.  Be sure to click on the selector in the attachments section to switch from detail inputs to an array item.  Then just fill out the email and add the array variable to the Attachments field.
    SendEmailAttachments

Now you can save and test your flow by filling out the Microsoft Form and uploading one or more attachments to the form.  In under 5 minutes you should get an email with the attachments from the form.

Approve a File Uploaded via Microsoft Forms

formApprova;I was asked recently if it was possible to upload a file via a Microsoft Form and then use Power Automate Approvals to Approve the file. The answer of course is YES, but that doesn’t answer the question of HOW? So in this POST I will walk through a simple example showing how this can be done.

Step #1 – Upload the file using Microsoft Forms

The first step is to create a Microsoft Form that can be used to upload a file.  There are two possibilities here.  First, if you are creating the Form personally then the file will be stored in your OneDrive. But if you are creating the Form as part of an Office 365 Group then the file will be stored in the SharePoint site that was created when the group was created. Either way the file is placed in a subdirectory called ‘/Apps/Microsoft Forms/{Name of the Form}/Question/’.  This makes it easy to find the file if you are uploading files from multiple forms. The file will also be uniquely named by adding the name of the submitter to the end of the original file name.

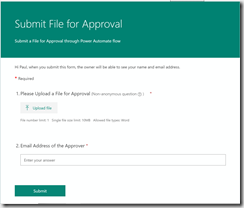
For our purposes I created a simple MS Form that had two questions.  The first lets the responder upload a file.  MS Forms has a specific question type that adds an attachment control to the form. Setting optional properties on the attachment control can also be used to limit the file extensions that can be uploaded, the maximum file size, and the maximum number of files. The second question is a text question used for the user to submit the email address of the person who is going to approve the file. Here’s a screenshot of the form I created.

Form

Step #2 – Create an Approval flow

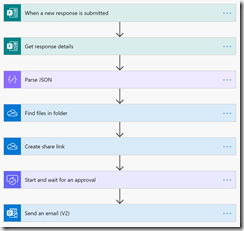
Now that we’ve used MS Forms to submit the file lets create a Power Automate flow to approve the file. Here’s a screenshot of the completed flow.  We’ll come back and examine each action.

Flow 

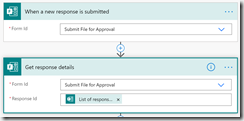
The flow is triggered when a new response is submitted to MS Forms. Unfortunately, the trigger doesn’t contain dynamic content that includes all the responses.  So we have to follow the trigger with a Get Response Details action to get the responder’s email address, the approver’s email address and the name of the file that was uploaded.  Here are the details for the MS Forms trigger and actions we are using. For the trigger the only parameter you need is to pick the form that you used to upload the file. Then get the details by picking the form and supplying the ID of the response returned by the trigger.

FormsActions

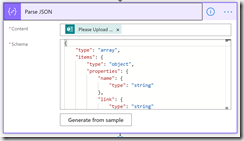
Once you’ve gotten the details from the form you need to isolate the Id of the file that was uploaded so you can share it with the Approver. The easiest way to do that is to Parse the JSON response from the Form response details. The trick here is to run the flow once before adding the Parse JSON action so you can get a sample output to use to generate the schema. Here’s a screenshot of the Parse JSON action.

parseJSON

Now that we have access to the Id for the file we can use that to create a sharing link to use in our approval so the approver can access the file.  However, even though we limited the Form upload to only one file it will return the file information as a collection.  So we’ll use a First() function to get the one record out of the collection to use with the Create a Share Link action. The formula to feed into the File parameter is ‘first(body(‘Parse_JSON’))?[‘id’]’. We set the action to provide a Link that is available to an anonymous user and provides only View permission.

CreateShareLink 

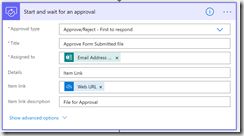
Now that we have the link we can create the Approval.  We fill out the Approval action as shown in the screenshot below with the email of the Approver from the Form response and the sharing link we generated above.

approval

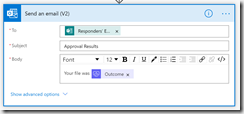
Once the Approver responds to the Approval we can complete the flow by sending an email back to the person who filled out the original Form with whatever details we want to supply.   The Send an Email V2 action uses the Responder’s email from the original Form Details action at the start of the flow.

email

That completes this walkthrough.  This should provide enough detail to get you started if you want to approve a file uploaded via an MS Form.