Make App Icons that Change with a Composed Look

Animated

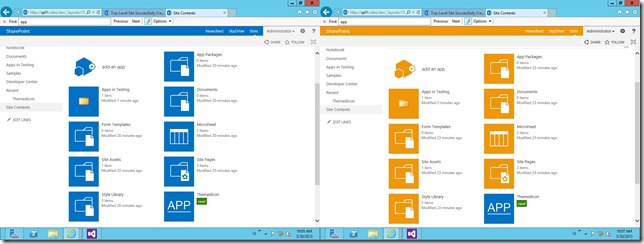
Recently a developer friend was wondering why all the built-in App Icons changed colors on his SharePoint 2013 site when he applied a different color scheme using the “Composed Looks” functionality,but Icons for custom apps he had deployed remained their original color.  The screenshot below shows the Site Contents page both before (Left Side) and after a Theme has been applied using a Composed Look (Right Side).  You can see that all the Icons on the page changed except the last one on the right.  This is the App that I installed using the Visual Studio 2012 SharePoint Hosted App project.  So the question is Why do all the other Icons change?

Appssidebyside

The first theory was that the App Icons were being recolored using the Theme CSS support that has been available since SharePoint 2010.  But the ability to recolor an image using CSS has always been limited to background images loaded through CSS.  These Icons are loaded using an <IMG> element so there is no way to specify the image in CSS and no way to recolor it.

After using IE’s Developer toolbar to examine the HTML and CSS on the pages above I found that the image itself doesn’t get recolored. But the <a> (anchor tag) that surrounds the Icon is a square rectangle occupying the space behind each image that has its background set to one of the theme colors.  You can see in the screenshot below that the <a> tag has its background set to a class of “ms-storefront-appiconspan’ which is set to an rgb color from a themable css file.  But why does changing the background behind the Icon change the color of the Icon?

appIconBackground

The trick is that the Icon file itself is a transparent PNG that is the same size, 90 X 90 pixels, as the anchor tag with the background color behind it.  That way the background color shows through the Icon and appears to recolor the icon itself.  So let’s see what happens to my Visual Studio project if I replace the blue in my App Icon with a Transparent background.  the image below shows the original Icon on the left and the new transparent Icon on the right after I cut the background out using Paint.Net.

appIcons

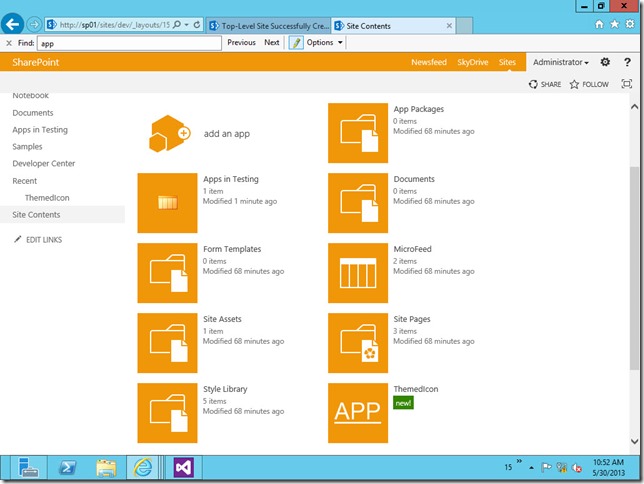
After uploading the new Icon image into my visual Studio project and redeploying the custom app you can see that the custom app Icon changes colors along with the Theme in the screenshot below.  If you restrict your Icon to white images and text on a transparent background then your Icon should look like it fits no matter what Composed Look is applied to your site.

AppAfter

Fix for “PDF iFilter Doesn’t Crawl Contents”

searchPDFI was working at a client this last week where we were having trouble getting SharePoint search to crawl the contents of PDF files.  My client said they followed this Microsoft installation guide (KB Article #2293357)  but the iFilter still wasn’t being used to crawl the contents of PDF files.  When I checked their installation I couldn’t find anything wrong either.  I was even more surprised that when I followed the same steps in my virtual dev environment I got the same results.  PDFs were searchable but only by title or other metadata.  The contents were not being indexed.  At that point I started searching the Internet for a solution and although I found lots of people with the same problem I didn’t find any solutions that would work.  For most people the solution was to make sure they added a registry key they missed or make sure it was installed on the correct server.  But there were some people, like my client and I, who followed the instructions correctly and still couldn’t get it to work.  At this point we opened a support ticket with Microsoft and were immediately provided with a solution that worked.  But since I haven’t been able to find this documented anywhere I thought I would record it in my BLOG.  So if you have tried setting up the 64 bit Adobe PDF iFilter and still can’t get it to work, then read on and try the following.  To be thorough I included all the steps required to install the iFilter, but highlighted the additional step that we took which made the difference.


Installing a PDF iFilter

  1. Download and Install the Adobe PDF iFilter 9 for 64-bit platforms
  2. Download a 16X16 PDF icon file from the Adobe web site and copy it to C:\Program Files\Common Files\Microsoft Shared\Web Server Extensions\14\TEMPLATE\IMAGES\
  3. Add the following entry in the docIcon.xml file, which can be found at: C:\Program Files\Common Files\Microsoft Shared\Web Server Extensions\14\TEMPLATE\XML
        <Mapping Key="pdf" Value="pdf16.gif" />
  4. Add the pdf file type to the Search Service Application’s File types
  5. Open regedit and navigate to the following location:
        HKEY_LOCAL_MACHINE\SOFTWARE\Microsoft\Office Server\14.0\Search\Setup\ContentIndexCommon\Filters\Extension
  6. Right-click and select New > Key to create a new key called ‘.pdf
  7. Add the following GUID as the default value for the .pdf key 
        {E8978DA6-047F-4E3D-9C78-CDBE46041603}
  8. Open Windows Explorer and navigate to the following location:
        C:\Program Files\Adobe\Adobe PDF iFilter 9 for 64-bit platforms\bin
  9. Add your Search Service Application’s Content Access Account to the list of users and groups who have security access to this folder.  Make sure the account has Read, Read & Execute, and List Folder Contents permissions.
  10. Reboot the SharePoint servers in your Farm to restart the Search Service Application


Note:  The Adobe installation instructions also recommend adding the bin folder location to the server’s environmental path variable.  But this has not been required in any of my installations and is not included in the Microsoft instructions.

Disabling the Silverlight Prompt in SharePoint 2010

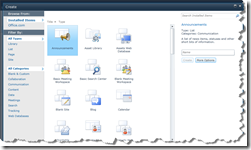
Don’t take the title of this post the wrong way.  I think Silverlight is a wonderful addition to SharePoint 2010 Foundation and Server.  After all, who would suggest that they really prefer the traditional user interface in screenshot 1 below, where the top half of the screen is taken up by instructions and a prompt to load Silverlight, over the Silverlight dialog interface in screenshot 2.  Unfortunately, silverlight requires that a plugin be installed on each user’s workstation and in some environments that is either problematic or forbidden by corporate policy.  This post will explore one option for solving that problem.
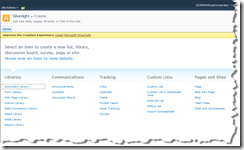
NoSilverlight

Screenshot1: No Silverlight

Silverlight

Screenshot2: Silverlight

I’ve been working recently on building an external facing SharePoint site for a client.  When we made the site available for internal users to test it we got reports back complaining about being prompted to install the Silverlight plugin.  Some of our testers either didn’t want to install Silverlight, or were on locked down workstations where they couldn’t install Silverlight.  Unfortunately, if they didn’t install Silverlight they kept getting the nag prompt to install it every time they did something that required Silverlight.  The client wanted a way to permanently remove the nag prompt so none of the external users were ever asked to install Silverlight.  If they already had Silverlight installed that was fine, but this web site should never prompt them to do the install.

In looking for a way to disable the prompt I found that the SPWebApplication object in SharePoint contains a property called AllowSilverlightPrompt.  When this property is set to false users will not be prompted to load Silverlight if it isn’t already installed.  This setting isn’t surfaced anywhere in Central Administration that I was able to discover.  I also found that trying to set it from a Web Part or _layouts application page required raising the privileges of the impersonated user changing the setting.  So in the end I decided to write some short PowerShell scripts that would handle changing the setting.  I wrote both a script to display the current setting and one to change the setting.  Let’s look at the simple Get-SilverlightSetting.ps1 script first.

   1: $webapp= $args[0]

   2: if ($webapp){$wa =  [microsoft.sharepoint.administration.spwebapplication]::lookup("$webapp")

   3: if($wa){

   4:     $switch = $wa.allowsilverlightprompt

   5:     if ($switch){

   6:         write-host "`nSilverlight Prompt " -nonewline;

   7:         write-host "Enabled" -foregroundcolor red -nonewline;

   8:         write-host " on $wa `n";}

   9:     else{

  10:         write-host "`nSilverlight Prompt " -nonewline;

  11:         write-host "Disabled" -foregroundcolor red -nonewline;

  12:         write-host " on $wa `n";}

  13: }else{

  14:     write-host "`nInvalid URL"; 

  15:     write-host "usage: get-silverlightsetting WebApplicationURL `n"}

  16: }else{

  17:     write-host "`nusage: get-silverlightsetting WebApplicationURL `n"}

This script checks in line 2 to see if you have passed a URL for a web application as a commandline parameter and prints out usage information in line 17 if you didn’t.  Line 2 then uses the URL to find a specific SPWebApplication object.  If it can’t find one then it prints out an error message and usage information in lines 14-15.  If the web application is found it uses lines 6-8 to print that its enavled if the allowSilverlightPrompt is True.  Otherwise it uses lines 10-12 to print that its disabled.  This script just displays the current setting and makes no changes.   (Note: the `n used in the write-host lines is an escaped newline character used in the script to format the output.)

Now let’s look at the Set-SilverlightSetting.ps1 script used to turn the silverlight prompt on or off.

   1: $webapp= $args[0]

   2: $switch = $args[1]

   3: if ($webapp){

   4:     $wa =  [microsoft.sharepoint.administration.spwebapplication]::lookup("$webapp");

   5:     if($wa){

   6:         if ($switch -eq $true){

   7:             $wa.allowsilverlightprompt = $switch;$wa.update()}

   8:         elseif ($switch -eq $false){

   9:             $wa.allowsilverlightprompt = $switch;$wa.update()}

  10:         else{

  11:             write-host "`nMissing Switch";

  12:             write-host "usage: set-silverlightsetting WebApplicationURL `$True|`$False`n"}

  13:     }else{

  14:         write-host "`nInvalid URL"; 

  15:         write-host "usage: set-silverlightsetting WebApplicationURL `$True|`$False`n"}

  16: }else{

  17:     write-host "`nusage: set-silverlightsetting WebApplicationURL `$True|`$False `n"}

This script is similar to the last one, but in line 2 it collects an extra commandline parameter representing whether the prompt should be turned on or off.  If it finds the web application it uses the parameter supplied to turn the prompt on in line 7 or off in line 9.  If the prompt is invalid an error message is printed using lines 11-12.   To use the scripts simply open the SharePoint 2010 Managment Shell (be sure to remember to use run as Administrator when opening the shell) and run the following command line from wherever you have the scripts.

.\Set-SilverlightSetting http://siteaddress $False

That will turn off the Silverlight prompt for all the sites on that Web Application.  Once you’ve done that screenshot #1 from above will look like this:
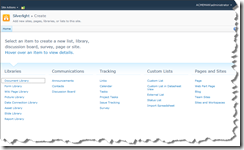
AfterSilverlight

I know it’s not a huge change, but it does remove the annoying yellow bar that makes it look like there is something wrong with your site if you don’t have Silverlight installed.  I hope that helps for all of you who work with SharePoint where Silverlight can’t be installed. 

For the rest of us….

I suggest you just install Silverlight and enjoy the newer interface.

Adding Useful Visual Studio External Tools

We add a couple of External Tools to our Visual Studio 2005 environment when teaching SharePoint classes to simplify some two common tasks encountered when developing for SharePoint.  The first tool generates a unique Globally Unique Identifier (GUID) and places it in your clipboard so that you can paste it directly into Features or Solution manifests.  The other tool can retrieive the Public Key BLOB and Token from a signed dll so that you can use them in custom webpart or dwp files, safe control entries, or custom code access security policies.  Integrating these tools into the menu of Visual Studio makes using them much more convenient than the command line alternatives.

Recently a student asked for a step by step guide to adding these external tools so they can add them to their own development environment.  Rather than simply respond back to them by email I thought it would be worthwhile to document the steps here for others who might also be interested.

Implementing guidgen.exe

  1. Select External Tools from the Tools menu in Visual Studio 2005.
  2. Click Add to add a new external tool to the menu.  You will see the following dialog box.

    External Tools

  3. Fill in the following:
         C&reate GUID for Title
         C:\Program Files\Microsoft Visual Studio 8\Common7\Tools\guidgen.exe for Command
         C:\Program Files\Microsoft Visual Studio 8\Common7\Tools for Initial directory

  4. Click OK to save the new menu entry.
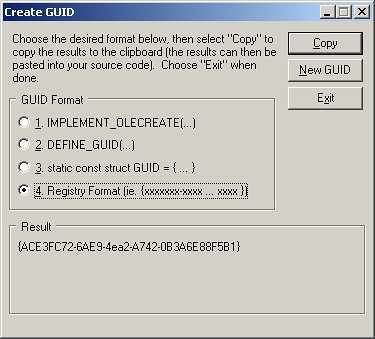
  5. Select Create GUID from the Tools menu and you will see the following dialog:

    Create GUID

  6. Be sure to select GUID Format #4, Click the New GUID button, and then the Copy button.  The GUID is now in your clipboard paste buffer. 
  7. Exit the tool and paste your GUID into Visual Studio.  (Note: be sure to remove the braces from the outside of the GUID since they aren’t needed.)

Implementing SN.exe

  1. Select External Tools from the Tools menu in Visual Studio 2005.
  2. Click Add to add a new external tool to the menu.  You will see the following dialog box.
  3. Fill in the following:
         &Get Token for Title
         C:\Program Files\Microsoft Visual Studio 8\SDK\v2.0\Bin\sn.exe for Command
         -Tp "$(TargetPath)" for Arguments
  4. Select the Use Output Window checkbox
  5. Click OK to save the new menu entry.
  6. Once you’ve built your project select Get Token from the Tools menu while one of your code files is open in the code editor and you will see something like the following in your Output Window:

    Output Window

  7. You can now highlight and copy either the Public key token or the Public key BLOB for use in your code.