Managing External Sharing in Office 365 – Part 1

Office365I presented a talk at a conference recently on how to use an existing Office 365 tenant to create an extranet without additional licensing fees.  A good part of the presentation was background on how external sharing works and the part played by access requests in the external sharing process flow.  After the talk I had several people who asked if I had ever blogged about the details that I covered in my talk or if I knew of anywhere else that this information was documented.  This post is the first in a series of posts that will document those details.  Here’s a brief overview of the posts in the series:

  • Part 1 – (This Post) A high level walk-through of how to configure external sharing starting with your O365 tenant and going down to an individual site collection.
  • Part 2 – How the process flow of sharing differs between sharing a site versus sharing a document and how Office 365 adjusts this experience
  • Part 3 – How external sharing depends on the site collection access request list to manage permissions for an external sharing invitation
  • Part 4 – How to use PowerShell to manage external users

Tenant Level Settings

The Office 365 admin center has a specific tab for managing external sharing settings for you tenant.  This post will focus on settings related to sharing SharePoint sites, but you can also control external sharing of Exchange calendars Lync, and the use of third party apps.  The Sharing Overview page provides On/Off toggles for whether external sharing is available in your tenant or not.  The default settings are shown in the following screenshot.

External Sharing Tenant

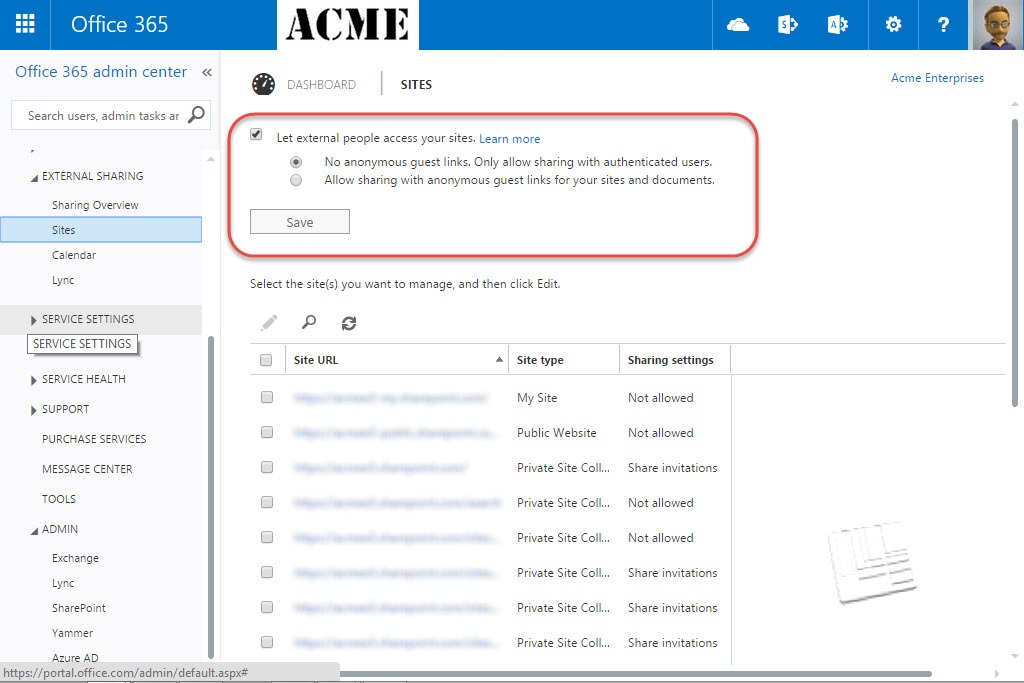
Selecting the Sites tab (or clicking on Go to detailed settings for sites)  will take you to a screen where you can set tenant level defaults for external sharing and view the site collections where external sharing has been enabled.

The tenant level default controls whether anonymous guest links can be used anywhere in the tenant or not.  If Anonymous guest links are enabled in a site collection, users can send email invitations that contain links to individual documents which can then be accessed WITHOUT LOGGING IN to SharePoint.  These links can be very dangerous if the original recipient shares the link since anyone can use the link to access the document.

This page also displays a list of all the site collections in your tenant and the current level of external sharing enabled for that site collection.  By default new site collections are created with external sharing disabled.  The External Sharing Sites page is displayed in the screenshot below:

External Sharing Sites page

SharePoint Admin Settings

The SharePoint admin center also provides settings that can be used to control the default External Sharing levels allowed in individual site collections.  These settings are not directly affected by the Tenant level settings described above.  Instead they provide an additional layer of configuration for External Sharing.  So even if External Sharing is disabled at the tenant level you will be able to adjust the site collection defaults available in the SharePoint Admin settings.  But when configuring External Sharing for individual site collections the level of sharing possible will respect both defaults.  For example, if guest links are disabled at the tenant level, but enabled in the SharePoint settings you still won’t be able to configure a site collection to allow the use of guest links.  The SharePoint Admin External Sharing settings are highlighted in the screenshot below:

External Sharing SharePoint defaults

Configuring a Site Collection

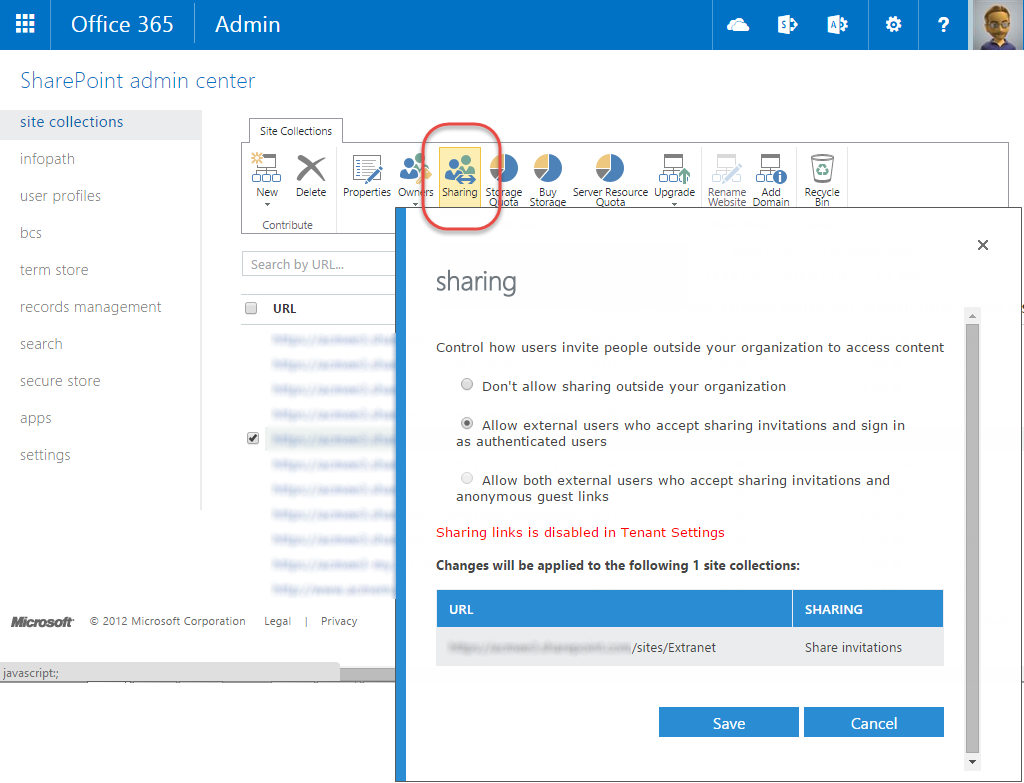
Once you’ve set all the defaults you can configure external sharing for individual site collections.  When a new site collection is created External Sharing is disabled by default.  Selecting a site collection and clicking on the Sharing button in the ribbon brings up a dialog where you can configure External Sharing for sites in that site collection.  There are three possible settings.  Don’t allow sharing will disable External Sharing for that site collection.  Allow external users… will allow sharing with authenticated external users.  And Allow both external users and…anonymous guest links will allow sharing with both authenticated and anonymous external users.  The tenant defaults and SharePoint defaults discussed earlier will limit which of these three options can be selected.  The sharing dialog is displayed in the screenshot below:

External Sharing Site Collection setting


Now that External is configured your users can begin extending sharing invitations to external users and creating anonymous guest links.  I’ll cover the process for sharing sites and documents with external users in Part 2 of this series.  Part 2 coming soon!

SkyDrive Pro Storage Increased to 25GB

sharepoint-2013-logo_sm

Microsoft announced today on the Office 365 technology Blog that they are increasing the default storage available in each user’s SkyDrive Pro to 25GB from the current 7GB.  They’ve also added an option allowing increase to 50GB or 100GBs of storage on a user by user basis.  The optional additional storage will come out of your regular tenant storage allocation.  Tenants can buy additional storage if needed at a cost of $.20 USD/GB/Month.  Microsoft is also adding a new view to SkyDrive Pro that will display links to all the documents that have been shared with you personally, no matter whose SkyDrive Pro they are stored on.  So you get more room for storing and sharing your own documents and easier access to all the documents that others have shared with you.  That’s what I call a Win/Win.

You can read the whole announcement here:

http://blogs.office.com/b/office365tech/archive/2013/08/27/skydrive-pro-increases-storage-and-ease-of-sharing.aspx

SharePoint 2013 has reached RTM

sp2013

Earlier today Microsoft announced that Office 2013, including SharePoint Server 2013, reached the Release to Manufacturing (RTM) build.  That means that coding and testing is complete and work will now commence on getting these products packaged up and into the appropriate distribution channels for customers.  YOu can read the full announcement here: 

Office Reaches RTM!


But here are some of the high points and important details covered in the announcement.

  • People who purchase Office 2010 after October 19, 2012 will get a free upgrade to Office 2013 when it is released.
  • Surface RT tablets will include a preview version of Office 2013 when they ship on October 26th.
  • Office 365 customers will begin to see some of the new 2013 capabilities with the next service update in November.
  • TechNet and MSDN subscribers should have access to RTM code by mid-November.  Which happens to be just after the SharePoint Conference November 12-15, 2012.

Office 365 Certification Exams Being Developed

Office 365Microsoft is currently working on two new certification exams for IT professionals who work with Microsoft Office 365 online systems.  The exams are due to be released in April, 2012.  If you work with Office 365 you should be working on the knowledge needed to pass these exams starting NOW!  You can read more about what skills each exam is designed to test using the links below:

Exam 70-323: Administering Office 365 intended for IT professionals who administer Microsoft Office 365 in an environment that may include Microsoft Exchange, Microsoft Lync, and/or Microsoft SharePoint

Exam 70-321: Deploying Office 365 intended for consultants and IT professionals who plan and implement Office 365. This includes migrations to Office 365 (simple and hybrid deployments)

Passing these exams will give you the following  certifications:

  1. Microsoft Certified Technology Specialist (MCTS): Administering Office 365 (pass Exam 70-323)
  2. Microsoft Certified IT Professional (MCITP): Office 365 Administrator (pass Exam 70-323 and Exam 70-321)


The links above provide an outline of what skills are being tested but at this point there is no official training material available for the exams.  Your best way to prepare is to work with the Product.

Managing Default Permissions in SharePoint Online (Office 365)

I stumbled across an interesting difference between the Enterprise and Professional level plans of Office 365 recently.  If you subscribe to a Microsoft Office for professionals and small businesses plan (Plan P) then any non-admin user added to SharePoint online automatically has Enhanced Contributor permission in all your sites.  But if you subscribe to one of the midsize businesses and enterprises plans (E plans) then adding users gives them no rights in SharePoint online.  You must add the users to SharePoint online sites just like you would add users to an on-premise SharePoint site.  Since most administrators only have access to one Office 365 plan this difference often goes un-noticed. 

But the more important question is how do you change the default behavior in the professional level plan.  Its actually quite simple once you know what to look for.  In your Office 365 admin page there is a link to change permissions on your Team sites and documents (see screenshot below)


o365perms1


Clicking on that link will take you to the Site permissions page for you default Team Site. 

NOTE:  Another difference between the two levels is that in the professional version you only get one Team site collection and one public website.  In Enterprise you can create multiple internal site collections but you are still limited to one public website.

On the site permissions page you will see a Domain Group named Tenant_Users (see screenshot below).  This is the group that contains ALL the users you create in Office 365.  You can see that the group is given the Enhanced Contribute permission level.  So every user that you create and assign a license to is automatically given permission to log on to your SharePoint online site.  This is very convenient, but causes a problem if you want most of your users to be limited to Read Only access to the site.

o365perms2


But once you recognize that this default group exists the solution is fairly simple. 

  • Select the checkbox next to the group
  • Click the Edit User Permissions button in the ribbon.
  • In the dialog that appears clear the check box next to Enhanced Contribute and select the check box next to either Read or View Only depending on how limited you want the average user’s permissions to be.  (see screenshot below)
  • Click OK


    o365perms3

    User’s will now default to either Read Only or View Only access to the site.  If you want to give them more permissions than that you’ll need to add them to an appropriate group or assign them rights individually.

    I’m sure there are other differences between the different plan levels that aren’t well documented.  This is just the first one I ran into.