I’ve seen several queries asking how to limit the items or documents that a user can view. Audiences can be used to filter views of List items and Library documents. But Audiences aren’t and never have been security. If a user wants access to all the items in a list or library all they need to do is create a custom view, no matter what audience they are part of.
So if you want to limit what a user has access to you need to set specific security on each item. Item level security defaults to inheriting the security settings of the list or library in which they are created. A user can implement specific security but it requires an additional step on each item created. You could create items in folders with specific permissions and let the items inherit security from the folders, but then you can’t easily display items from diferent folders in a single view.
So the question is: How can I set specific security rights automatically based on who the user is, content type, or the value of a metadata field?
In this post I’ll explain how to create an event handler that will automatically set security permissions based on the content type used to create the item. First, lets look at the code of the event handler.
01: public class ItemSet : SPItemEventReceiver
02: {
03:   public override void ItemAdded(SPItemEventProperties properties)
04:   {
05:     base.ItemAdded(properties);
06:     SPWeb web = properties.OpenWeb();
07:     SPList list = web.Lists[properties.ListId];
08:     SPRoleAssignmentCollection roles = list.RoleAssignments;;
09:     SPListItem addedItem = properties.ListItem;
10:     addedItem.BreakRoleInheritance(false);
11:     foreach (SPRoleAssignment r in roles)
12:     {
13:       if (r.Member.Name.ToString().StartsWith(properties.ListItem.ContentType.Name
14:         .ToString(), StringComparison.CurrentCultureIgnoreCase))
15:       {
16:         addedItem.RoleAssignments.Add(r);
17:       }
18:     }
19:     this.DisableEventFiring();
20:     addedItem.Update();
21:     this.EnableEventFiring();
22:   }
23: }
In lines 6-8 the event handler instantiates the Sharepoint web holding the list and walks the heirarchy to get the list instance itself. We’ll use this later to retrieve the groups that have permission to the list. Line 9 retrieves the list item that was just added. Line 10 calls the BreakRoleInteritance method to set the item up with its own security listing. Passing ‘False’ as a parameter tells Sharepoint not to copy the security settings of the list when breaking inheritance. The foreach loop in lines 11-18 compares the Name of each user/group who has permissions in the list with the ContentType of the item being added. If the name of the user/group begins with the name of the Content type it is added to the permissions list of the item. For example, if the Content type of the item is named ‘TypeA’ then groups named ‘TypeAContribute’ and ‘TypeARead’ would be granted permissions on the item, but a group called ‘TypeBContribute’ would not. Finally, in lines 19-21 the event handler temporarily suspends event processing and updates the item instance in the Sharepoint database. Events are temporarily disabled to prevent recursive events like ItemModifying from firing as a result of the security change.
Once the event handler has been strong named, compiled, added to the GAC and activated using a Web scoped feature we are ready to test the results. The steps are listed below:
- Create and add specific content types to the list/library being secured.
- Create Sharepoint groups in the top level site of the site collection whose names start with the name of the content type that they should have access to. For example: TypeAContribute group would have Contribute permissions for TypeA content.
- Assign the Sharepoint groups appropriate permission levels to the list.
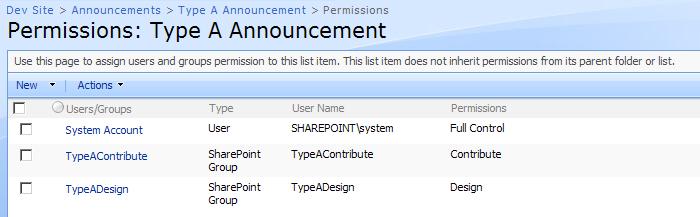
- Now create a new item in the list and security will automatically be changed so that only groups whose names start with the name of the content type will have access to the item. For example, when I created an announcement based on a content type called ‘TypeA’ the security was set as shown below:
 When a member of one of the TypeA groups logs in they see and can access only the annoncements created using the TypeA content type.�
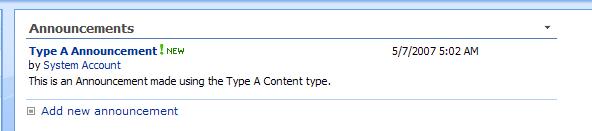
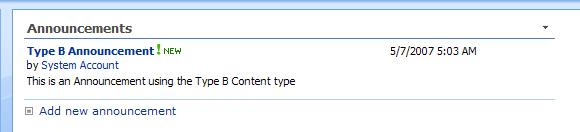
But when a user logs in who is a member of a group called ‘TypeBContribute’ they only see and can access announcements based on the TypeB content type.
You could modify the basic shell of this event handler in several ways to meet the requirements of other scenarios. For example, you could compare the groups with defined permissions in the list to the groups that the author is a member of and only add groups that the author and the list share in common. Or you could add a custom choice field to the list with the names of sharepoint groups and let the user choose which groups to grant access to when creating the item. Once you’ve got the basic event handler the only limits on setting security to a local list item is your own creativity.