Adding Custom Web Part Page Templates

I was recently asked whether it was possible to add custom Web Part Page templates to the Create page in SharePoint 2007 or whether the interface was limited to the eight existing Web Part Pages and required you to replace one of those.  I knew this was possible in SharePoint 2003 and that there was an MSDN article entitled Creating Custom Web Part Page Templates for Microsoft SharePoint Products and Technologies that explained how to do it.  But since I had never tried it in 2007 I decided to investigate.

It turns out that the answer isn’t a simple yes or no.  The link on the Create page uses a page called  spcf.aspx to list out the web part templates.  Although you can easily add a ninth template to the list the page uses owssvr.dll to instantiate the new web part page and it seems to be hard coded to only accept templates numbered 1 through 8.  So you can’t simply create a custom copy of spcf.aspx with a modified list of Web Part Page templates.  But there is still a way to implement a set of Custom Web Part Page templates.

Interestingly enough if you follow the directions in the SharePoint 2003 MSDN article mentioned above and use the files downloaded from the article you can make this work.  The spcf.aspx file in the article download does not use owssvr.dll and is not limited to only 8 templates.  The problem is that this file was designed for SharePoint 2003 and continues the look and feel of that product.  You also have to make allowances for some path changes since the 2003 product.  So I decided to update the custom page to use a SharePoint 2007 Master Page and relist the steps in the article with modifications for the SharePoint 2007 environment.

NOTE: In addition to updating the custom creation page for a Master Page environment certain code changes were also required.  You must use the custspcf.aspx code available for download from this BLOG as a starting point to make this work.

Steps to add Custom Web Part Page Templates

  • Download custom creation page (custspcf.aspx) from here and copy it 12 hive on your Web front end servers.  The file should be copied to the following directory Local_drive:\Program Files\Common Files\Microsoft Shared\Web Server Extensions\60\TEMPLATE\LAYOUTS\1033.   (Note: If you are running on a server installed in a language other than English replace 1033 with the Language Code Identifier for your language.)
  • Open the new custspcf.aspx file in Visual Studio or another suitable text/html editor.
  • Search for onetidWebPartPageTemplate in the custspcf.aspx file.  This is the ID of the selection list for the Web Part Page templates.  There are two selections already included for the file, one for Custom1.aspx (set to be the default selection) and the other for Custom2.aspx.  If you only want two custom templates skip step 4.
  • To add additional templates increment the size attribute of the Select element to the number of choices in the list and duplicate the second Option element in the list.  Change the name value of the Option element using a pattern of Custom#, where # is the next index in the list of selections.
  • Add the new custom Web Part Page template, named Custom# to match the entry in step 4, to the Local_drive:\Program Files\Common Files\Microsoft Shared\Web Server Extensions\60\TEMPLATE\1033\STS\DOCTEMP\SMARTPGS directory.  
  • Copy an image file named Custom#.gif for each of the Web Part Page templates you wish to add where # is the number of the template in the list to Local_drive:\Program Files\Common Files\Microsoft Shared\Web Server Extensions\60\TEMPLATE\LAYOUTS\1033\IMAGES
  • Add a Link to custspcf.aspx to the Create.aspx page stored in the Local_drive:\Program Files\Common Files\Microsoft Shared\Web Server Extensions\60\TEMPLATE\LAYOUTS directory.  NOTE: You may need to put a copy of this page back in the future so make sure you have a backup copy before editing it.    To add the link search for onetidWebPartPage.  Go to the next tag and insert the following code block immediately after the tag, but before the start of the "/>".
      1: <table style="padding: 3px 0px 3px 4px;" class="ms-itemstatic" onclick="javascript:NavigateInnerHref(event)" onmouseover="this.className='ms-itemhover';ShowListInformation('"
    
      2:   <SharePoint:EncodedLiteral runat="server" EncodeMethod="EcmaScriptStringLiteralEncode" Text=""
    
      3:   <%$Resources:wss,viewlsts_wp_page_title%>
    
      4:     "/>','<SharePoint:EncodedLiteral runat="server" EncodeMethod="EcmaScriptStringLiteralEncode" Text=""<%$Resources:wss,viewlsts_wp_page_desc%>
    
      5:       "/>','/_layouts/images/ltsmrtpg.gif')" onmouseout="this.className='ms-itemstatic';HideListInformation()" cellspacing="0" cellpadding="0" width="100%" border="0">
    
      6:       <tr>
    
      7:         <td valign="top" nowrap="" class="ms-descriptiontext" style="padding-top:1px">
    
      8:           <IMG src="/_layouts/images/setrect.gif" width="5px" height="5px" alt=""
    
      9:           <SharePoint:EncodedLiteral runat='server' text=''
    
     10:           <%$Resources:wss,viewlsts_wp_page_desc%>' EncodeMethod='HtmlEncode'/>">&nbsp;
    
     11:         </td>
    
     12:         <td valign="top" width="100"% class="ms-descriptiontext">
    
     13:           <a id="onetidCustWebPartPage" href="Custspcf.aspx" target="_self">
    
     14:             <SharePoint:EncodedLiteral runat="server" text="Custom Web Part Page" EncodeMethod='HtmlEncode'/>
    
     15:           </a>
    
     16:         </td>
    
     17:       </tr>
    
     18:     </table>

That’s all you need.  The next time you browse to the Create page you will see a link to Custom Web Part Page.  When you click that link you will see a page that looks like the regular creation page for Web Part Pages, but this one will have your custom templates on it. Even better you will be able to add more than 8 to the list and it will continue to work.  Just like it did in SharePoint 2003.

Adding Useful Visual Studio External Tools

We add a couple of External Tools to our Visual Studio 2005 environment when teaching SharePoint classes to simplify some two common tasks encountered when developing for SharePoint.  The first tool generates a unique Globally Unique Identifier (GUID) and places it in your clipboard so that you can paste it directly into Features or Solution manifests.  The other tool can retrieive the Public Key BLOB and Token from a signed dll so that you can use them in custom webpart or dwp files, safe control entries, or custom code access security policies.  Integrating these tools into the menu of Visual Studio makes using them much more convenient than the command line alternatives.

Recently a student asked for a step by step guide to adding these external tools so they can add them to their own development environment.  Rather than simply respond back to them by email I thought it would be worthwhile to document the steps here for others who might also be interested.

Implementing guidgen.exe

  1. Select External Tools from the Tools menu in Visual Studio 2005.
  2. Click Add to add a new external tool to the menu.  You will see the following dialog box.

    External Tools

  3. Fill in the following:
         C&reate GUID for Title
         C:\Program Files\Microsoft Visual Studio 8\Common7\Tools\guidgen.exe for Command
         C:\Program Files\Microsoft Visual Studio 8\Common7\Tools for Initial directory

  4. Click OK to save the new menu entry.
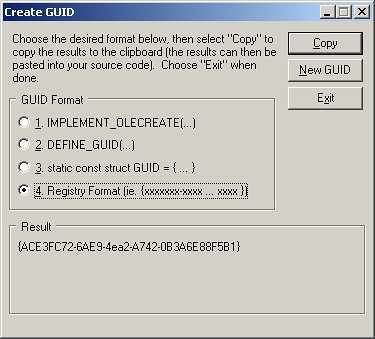
  5. Select Create GUID from the Tools menu and you will see the following dialog:

    Create GUID

  6. Be sure to select GUID Format #4, Click the New GUID button, and then the Copy button.  The GUID is now in your clipboard paste buffer. 
  7. Exit the tool and paste your GUID into Visual Studio.  (Note: be sure to remove the braces from the outside of the GUID since they aren’t needed.)

Implementing SN.exe

  1. Select External Tools from the Tools menu in Visual Studio 2005.
  2. Click Add to add a new external tool to the menu.  You will see the following dialog box.
  3. Fill in the following:
         &Get Token for Title
         C:\Program Files\Microsoft Visual Studio 8\SDK\v2.0\Bin\sn.exe for Command
         -Tp "$(TargetPath)" for Arguments
  4. Select the Use Output Window checkbox
  5. Click OK to save the new menu entry.
  6. Once you’ve built your project select Get Token from the Tools menu while one of your code files is open in the code editor and you will see something like the following in your Output Window:

    Output Window

  7. You can now highlight and copy either the Public key token or the Public key BLOB for use in your code.

Feature to Install a Custom Master Page

A former student brought an excellent BLOG post that Heather Solomon made last October (http://www.heathersolomon.com/blog/articles/servermstpageforsitecollect_feature.aspx) to my attention recently.  Heather demonstrated how to create a Feature that could be used to install a Custom Master Page for a Site Collection.  There was however one limitation to the approach that Heather used, it could only be used on a Site where the Publishing Feature was enabled.  My student wondered if there was a way to do something similar for regular WSS Team Sites.

Normally, I teach students how to do this by planning ahead and creating or modifying Site Definitions BEFORE you create the Site Collection and Top Level Site.    The MasterUrl and CustomMasterUrl attributes represent two replaceable parameters that can be used to set the Masterpage attribute of the @Page declaration on the pages of a SharePoint site.  “Out of the Box“ .aspx pages point to a Masterpage at ~/masterurl/default.master. This will be replaced at runtime by the MasterUrl property of the Website.  The default setting for this is _catalogs/masterpage/default.master.  This is the default.master file in the Master Pages gallery of the website.  Until you edit this file using SharePoint Designer it will point to a ghosted copy of the file in the TEMPLATE\GLOBAL directory of the 12 hive.  You can also ghost custom .Master files from your Site Definition directory into the Masterpage gallery of the site using a Module Element.  Then you can set the MasterUrl and/or CustomMasterUrl attributes of the Configuration Element in the ONET.xml file to point at these ghosted .Master files.  If you also change the @Page directive of the .aspx files on your site to use ~/masterurl/custom.master you will establish a hierarchy of master pages that will be used.  The page will first try to use the customMasterUrl setting, then the masterUrl setting, and finally the default.master file in GLOBAL.

Making these changes later will NOT result in a change to existing Sites, but you can also set the MasterUrl and CustomMasterUrl properties of a Website programmatically.  So I reasoned it would be possible to create an Event Handler that would fire when a Feature was activated to set these properties and then move the .Master files using a Feature Module.  Activating this Feature on a site would accomplish the same changes outlined above by a custom site definition.  Here’s how it can be done.

First, we need a Feature. To create our Feature we need a Subdirectory Called CustomMaster in the TEMPLATE\FEATURES directory of the 12 hive.  Then we need add 4 files to this directory:  Feature.xml, Elements.xml, Custom.master, and myDefault.master.

FEATURE.XML This file is used to identify the feature and list out the items that will be part of the Feature.  Our Feature will include an assembly that will contain code to run in response to Feature events and an Elements.xml file.  The code for our Feature is listed below:

   1:  <?xml version="1.0" encoding="utf-8" ?>
   2:  <Feature xmlns="http://schemas.microsoft.com/sharepoint/"
   3:           Id="90969656-A1C9-4f40-A95F-A3BDDF5723BF"
   4:           Title="Use Custom Master File"
   5:           Scope="Web"
   6:           ReceiverAssembly="CustomMaster, Version=1.0.0.0,
   7:               Culture=neutral, PublicKeyToken=bcee0f83b26fbb16"
   8:           ReceiverClass ="CustomMaster.ChangeMaster" >
   9:      <ElementManifests>
  10:          <ElementManifest Location="Elements.xml"/>
  11:      </ElementManifests>
  12:  </Feature>

ELEMENTS.XML – In this file we will identify two .Master files that will be ghosted to the masterpages gallery of the site.

   1:  <?xml version="1.0" encoding="utf-8" ?>
   2:  <Elements xmlns="http://schemas.microsoft.com/sharepoint/">
   3:      <Module Name="AddMasters" Url="_catalogs/MasterPage" >
   4:          <File Url="MyDefault.master" Type="GhostableInLibrary"
   5:            IgnoreIfAlreadyExists="True">
   6:            <Property Name=“ContentType
   7:               Value=“$Resources:cmscore,contenttype_masterpage_name;" />
   8:          </File>
   9:          <File Url="custom.master" Type="GhostableInLibrary" 
  10:            IgnoreIfAlreadyExists="True">
  11:            <Property Name=“ContentType
  12:               Value=“$Resources:cmscore,contenttype_masterpage_name;" />
  13:          </File>
  14:    </Module>
  15:  </Elements>

MYDEFAULT.MASTER and CUSTOM.MASTER – These are copies of the default.master file from the TEMPLATE\GLOBAL directory of the 12 hive.  If your .aspx page references the master file ~/masterUrl/default.master then myDefault.master will be used.  If you reference ~/masterUrl/custom.master then Custom.Master will be used.  WARNING: Do not use SharePoint Designer to edit files stored in the 12 hive.  This would break the files.

The last piece of the Feature is a Feature event handler that will be used to modify the masterUrl and customMasterUrl properties of the Website programmatically.  The event handler will set the properties when the Feature is activated and reset them to the default when the Feature is deactivated.  The code for the event handler is listed below:

   1:  using System;
   2:  using System.Collections.Generic;
   3:  using System.Text;
   4:  using Microsoft.SharePoint;
   5:   
   6:  namespace CustomMaster
   7:  {
   8:      public class ChangeMaster:Microsoft.SharePoint.SPFeatureReceiver 
   9:      {
  10:          public override void FeatureInstalled
  11:            (SPFeatureReceiverProperties properties)
  12:          {
  13:          }
  14:          public override void FeatureUninstalling
  15:             (SPFeatureReceiverProperties properties)
  16:          {
  17:          }
  18:          public override void FeatureActivated
  19:             (SPFeatureReceiverProperties properties)
  20:          {
  21:              SPWeb CurrentWeb = properties.Feature.Parent as SPWeb;
  22:              CurrentWeb.MasterUrl = "/_catalogs/masterpage/MyDefault.master";
  23:              CurrentWeb.CustomMasterUrl = "/_catalogs/masterpage/custom.master";
  24:              CurrentWeb.Update();
  25:          }
  26:          public override void FeatureDeactivating
  27:             (SPFeatureReceiverProperties properties)
  28:          {
  29:              SPWeb CurrentWeb = properties.Feature.Parent as SPWeb;
  30:              CurrentWeb.MasterUrl = "/_catalogs/masterpage/default.master";
  31:              CurrentWeb.CustomMasterUrl = "/_catalogs/masterpage/default.master";
  32:              CurrentWeb.Update();
  33:         }
  34:      }
  35:  }
  36:   

Once the event handler has been compiled and added to the Global Assembly Cache and the Feature directory has been created you can Install and Activate the Feature.  To install the Feature use the following command line:

stsadm -o installfeature -n CustomMaster

Then you can go to the Site Features link in SiteSettings on any SharePoint website and activate the Feature.  Every website where the Feature is activated will use the myDefault.master stored in the Feature as its .master file.  If you modify the @Page declaration of a page on the site to use ~/masterUrl/Custom.master then the Custom.master will be used.

*** Updated July 3, 2008 ***

I noticed recently that I left one line out of the Elements.xml file which prevented the feature from working in Site Collections where Publishing was turned on.  In those sites the master pages gallery contains two content types so you have to specify what type of file you are "ghosting" with your .  The Code that was added is italized in the code listing above.

Set Item Security based on Content Type

I’ve seen several queries asking how to limit the items or documents that a user can view.  Audiences can be used to filter views of List items and Library documents.  But Audiences aren’t and never have been security.  If a user wants access to all the items in a list or library all they need to do is create a custom view, no matter what audience they are part of.

So if you want to limit what a user has access to you need to set specific security on each item.  Item level security defaults to inheriting the security settings of the list or library in which they are created.  A user can implement specific security but it requires an additional step on each item created.  You could create items in folders with specific permissions and let the items inherit security from the folders, but then you can’t easily display items from diferent folders in a single view.

So the question is:  How can I set specific security rights automatically based on who the user is, content type, or the value of a metadata field?

In this post I’ll explain how to create an event handler that will automatically set security permissions based on the content type used to create the item.  First, lets look at the code of the event handler.

01: public class ItemSet : SPItemEventReceiver
02: {
03:   public override void ItemAdded(SPItemEventProperties properties)
04:   {
05:     base.ItemAdded(properties);
06:     SPWeb web = properties.OpenWeb();
07:     SPList list = web.Lists[properties.ListId];
08:     SPRoleAssignmentCollection roles = list.RoleAssignments;;
09:     SPListItem addedItem = properties.ListItem;
10:     addedItem.BreakRoleInheritance(false);
11:     foreach (SPRoleAssignment r in roles)
12:     {
13:       if (r.Member.Name.ToString().StartsWith(properties.ListItem.ContentType.Name
14:         .ToString(), StringComparison.CurrentCultureIgnoreCase))
15:       {
16:         addedItem.RoleAssignments.Add(r);
17:       }
18:     }
19:     this.DisableEventFiring();
20:     addedItem.Update();
21:     this.EnableEventFiring();
22:   }
23: }
 

In lines 6-8 the event handler instantiates the Sharepoint web holding the list and walks the heirarchy to get the list instance itself.  We’ll use this later to retrieve the groups that have permission to the list.  Line 9 retrieves the list item that was just added.  Line 10 calls the BreakRoleInteritance method to set the item up with its own security listing.  Passing ‘False’ as a parameter tells Sharepoint not to copy the security settings of the list when breaking inheritance.  The foreach loop in lines 11-18 compares the Name of each user/group who has permissions in the list with the ContentType of the item being added.  If the name of the user/group begins with the name of the Content type it is added to the permissions list of the item.  For example, if the Content type of the item is named ‘TypeA’ then groups named ‘TypeAContribute’ and ‘TypeARead’ would be granted permissions on the item, but a group called ‘TypeBContribute’ would not.  Finally, in lines 19-21 the event handler temporarily suspends event processing and updates the item instance in the Sharepoint database.  Events are temporarily disabled to prevent recursive events like ItemModifying from firing as a result of the security change.

Once the event handler has been strong named, compiled, added to the GAC and activated using a Web scoped feature we are ready to test the results.  The steps are listed below:

  1. Create and add specific content types to the list/library being secured.
  2. Create Sharepoint groups in the top level site of the site collection whose names start with the name of the content type that they should have access to.  For example: TypeAContribute group would have Contribute permissions for TypeA content.
  3. Assign the Sharepoint groups appropriate permission levels to the list. 
  4. Now create a new item in the list and security will automatically be changed so that only groups whose names start with the name of the content type will have access to the item.  For example, when I created an announcement based on a content type called ‘TypeA’ the security was set as shown below:TypeA SecurityWhen a member of one of the TypeA groups logs in they see and can access only the annoncements created using the TypeA content type.�TypeA 

But when a user logs in who is a member of a group called ‘TypeBContribute’ they only see and can access announcements based on the TypeB content type.

TypeB

You could modify the basic shell of this event handler in several ways to meet the requirements of other scenarios.  For example, you could compare the groups with defined permissions in the list to the groups that the author is a member of and only add groups that the author and the list share in common.  Or you could add a custom choice field to the list with the names of sharepoint groups and let the user choose which groups to grant access to when creating the item.  Once you’ve got the basic event handler the only limits on setting security to a local list item is your own creativity.