Re-awarded as an MVP for the 11th Year

MVP_Logo_Secondary_Blue288_RGB_300ppiFor the last 10 years July 1st has always been a day that I both looked forward to and dreaded.  I’ve looked forward to it because its anniversary of the day that I was awarded the honor of being named as a Microsoft Most Valuable Professional for the first time. But I’ve also dreaded it.  Because no matter how many presentations you’ve made or how much you’ve answered questions on the forums or active you’ve been in the community, you always wonder if its been enough. But then sometime around mid-day the email arrives saying that you have been re-awarded for another year as an MVP.  That email arrived for me today around 11:40 AM (9:40 AM Redmond time). So for the 11th year Microsoft has decided that my contributions to the SharePoint and Office 365 community were sufficient to earn  me an MVP award again for the category of “Office Servers and Services”. 

But this coming year will be a little different than previous years because I plan to move towards partial retirement from my consulting career. Before you get the idea that I’ll be less involved as an MVP, think again. Being an MVP has always been about your contributions to the technical community over and above your regular job. So in the past I often took vacation time to speak at conferences or spent time on the forums before and after work.  Since I won’t be focusing on “earning a paycheck” anymore I’ll be able to devote even more time to community activities. I’m expecting my contributions to the community will go up as I move to retirement, not fade away.

So, I make this offer to Community Leaders

If you are looking for a SharePoint or Office 365 speaker for your event, and you can help me defray travel expenses, I will be willing to travel almost anywhere, at anytime to share what I have learned over the years.

SharePoint, Office 365, and Dynamics CRM are subjects that I’m passionate about. And my moving towards retirement is just a partial thing. I still plan to continue to do consulting and training for many years to come. If consulting/training opportunities come my way I will continue to work. Because that’s now I keep learning new things. But if paying jobs don’t happen to come my way then I’ll live off my retirement savings and spend even more time speaking and answering questions. 

So here’s to another year as an MVP. I think it will be an exciting one.

Fix for: Can’t Connect to Azure VM via RDP

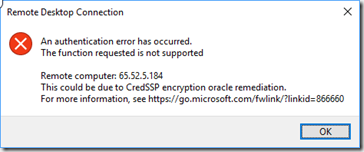
RDP errI use Azure Virtual Machines (VMs) a lot for demos and testing.  Recently when I tried to connect to some of my VMs using remote desktop I got a error message.  The message read “An authentication error has occurred. The function requested is not supported.”  Researching this error on the Internet led me to a security update applied to Windows 10 and Windows Server 2016 that was rolled out on April 17, 2018.  This update includes an update for the Remote Desktop Client (RDP) to fix a CredSSP authentication protocol vulnerability.  After the update is applied you can no longer RDP to any machine that isn’t fully updated.  My problem was that my Windows 10 laptop had been updated, but my Azure VMs had not been updated.

I’ve seen several fixes on the Internet to workaround this problem temporarily using registry settings or Group Policy Objects (GPO). Unfortunately, the only Active Directory server involved was also on Windows Server 2016, so there was no way to attach to it make registry changes or modify GPO settings. But I was able to find another workaround that let me access the affected servers via RDP so that I could update them.

The Solution

The trick was to find a server or workstation that hadn’t been updated yet. In my case I had a local Windows 8.1 Hyper-V VM that I hadn’t updated in a while.  Using that I was able to access the affected VMs and run Windows Update.  Once the update was applied I could RDP into them from my Windows 10 laptop.

I also found that I could still RDP from my iPhone to the affected servers to apply the update.  I admit that the screen size is pretty small and difficult to work with, but it is possible.  So if you don’t have a workstation or server that hasn’t been upgraded recently you can try to RDP in from your non-Microsoft phone.  Note: I didn’t try using Android, but I assume it will also work.

Presentation to Cincinnati SPUG: Protecting Your Content with SharePoint DLP

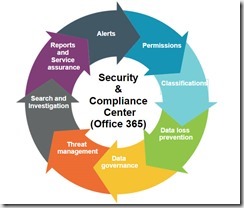
security and compliance centerLast week I presented a talk to the Cincinnati SharePoint User’s Group entitled, “Protecting your Content: Demystifying Data Loss Prevention (DLP)
in SharePoint 2016
”. I couldn’t make it to the user group in person, but they were nice enough to let me present it via Skype. At the end of the talk I promised to post my slides.

You can download a read only copy of the slides from the talk using the link below:

Protecting your Content: Demystifying Data Loss Prevention (DLP)

SharePoint Fest – DC Wrap-up & Slides

My wife and I really enjoyed our visit to Washington DC last week.  The conference attendees were great and both my sessions and workshop were well attended.  It was a pleasure to feel that I was sharing information that people really wanted to learn about.  The week was even better because at night we got to spend time with my daughter, son-in-law, and 6 month old granddaughter.  Getting to present at a conference and spend time with family and friends is a great combination.
I promised to make my slides available, so I’ve uploaded them here.  They are also available on the SharePoint Fest DC site for attendees.  If you have any follow-up questions please email me at pstork@dontpapanic.com.  You can download a copy of the slides from each talk using the links below:

WS 203 – Office 365 Feature Explosion: What should you be using

ADM 105 – Protecting your Content: Demystifying Data Loss Prevention (DLP) in SharePoint

BV 204 – Implementing SharePoint: Failure to Plan is Planning to Fail

SPT 202 – Ensuring Business Continuity: Planning for High Availability and Disaster Recovery in SharePoint


Changing Default Permissions in Office 365 Group Sites

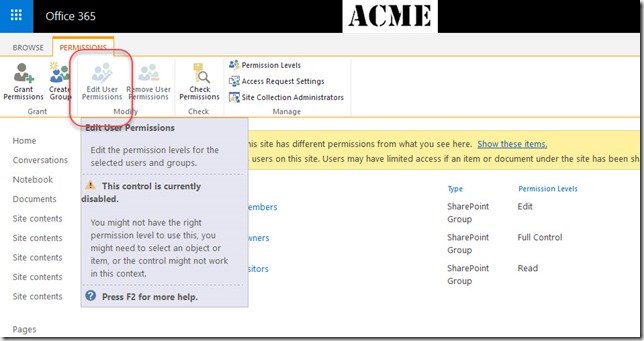
CloudLockChanging the permissions assigned to the default Owners, Members, and Visitors groups in a SharePoint site is easy.  You just navigate to Site Settings > Site Permissions.  Then select the group whose permissions you want to change and assign them a new permission level using the Edit User Permissions button in the Ribbon.  But that won’t work in the Site created behind an Office 365 Group.  When you try to use the same procedure you find that the Edit User Permissions button is greyed out if you select any of the built in administrative groups.  (See the Screenshot below.

EditGroupPermissions

The problem is that Office groups are created when you create a Security Group in Office 365. By default that security group is added to the built-in Members group of the Site Collection.  To make sure that you don’t inadvertently lock users out of the site Microsoft disables your ability to change the permission on the default Administrative groups when using an Office Group based site. 

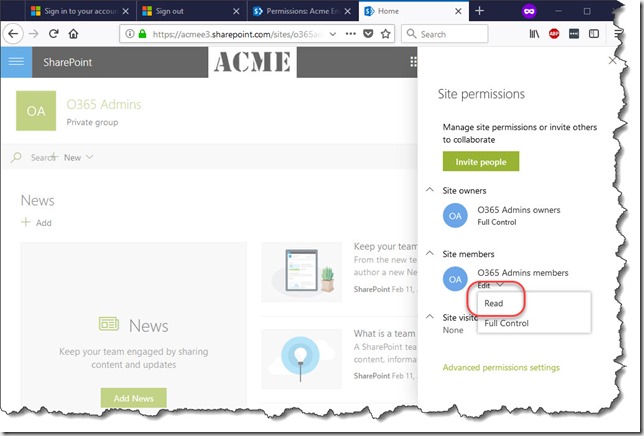
But there is still a way to modify the permissions for the users in the groups.  If you navigate to the home page of the site and select Site Permissions from the Settings menu (the gear) you will see a panel open on the right hand side of the browser window.  Under Site Members you will see the security group that provides the basis for the Office group you created. If you select Edit under that group you can change the permissions for the members of the group to either Read or Full Control. However, instead of changing the permission level for the group it will actually move the security group to either the Site Visitors or Site Owners groups respectively.

O365Change Group permissions

But what if I want to change the default group’s permissions to Contribute instead of Edit? To do that you’ll need to use two different SharePoint groups. 

  • First, use the Site permissions panel to move the underlying security group from the Site Members group to the Site Visitors group.  This will give all your users Read permissions to the site.
  • Second, click on the Advanced permissions settings link at the bottom of the panel.  This will take you to the regular site permissions page that you are used to.  Now you can create a new SharePoint group and assign it whatever permission level you want.  After you create the group add the same security group you moved above as a member of the new SharePoint group.  Since SharePoint permissions are additive this will give all your users both Read permission and whatever new permission level you assigned, for example Contribute.

I hope that clarifies how to manage Permissions in the new Office 365 group sites.  Since Team sites are based on Office Groups, the same procedure applies to any Team sites you’ve created.