Collab365 MicroJobs: I will build you a Dev Farm in Azure

1200x600_c365_microjobs_featuredimg

If you’re struggling to find help or keep up to date with Microsoft SharePoint then I will build you a basic SharePoint 2013/2016/2019 Dev farm in Azure.

I am now a registered Freelancer on Collab365 MicroJobs – the brand new marketplace dedicated to Microsoft professionals.

Here are 4 reasons that the Collab365 Team have spent months building the site:

  1. You often need expert Microsoft help just for a couple of hours.
  2. You can’t keep up with everything Microsoft is releasing.
  3. You find it hard to find Microsoft experts on other non-dedicated sites. There are just too many other subjects covered.
  4. You don’t have time to go through a lengthy interview process.

I personally love the concept and have actually just posted a MicroJob. Here are the details…

How I can help you …


Building out a SharePoint farm to use as a Dev/Test environment can be a long tedious process.  It also usually requires hardware resources that aren\’t always available.  Using Azure you can spin up new VMs relatively quickly, but installing and configuring SharePoint can still take a significant amount of time.  There are pre-built Azure templates, but these often don\’t provide the flexibility needed to configure a specific environment.
Using a combination of PowerShell and Desired State Configuration (DSC) we will design and build a basic  server farm consisting of three (3) virtual machines (AD, SQL, and SharePoint) to your specifications.  The farm will include the following:

  • One (1) Active Directory domain controller configured to the domain name of your choice containing ten (10) Service accounts to support installation of SQL and SharePoint
  • One (1) SQL server configured using a domain service account to support SharePoint
  • One (1) SharePoint 2013, 2016 or 2019 server
  • Up to three (3) Web Applications
  • Up to ten (10) Site Collections
  • Core Service Applications (Application Management, Managed Metadata, Search, Secure Store, State, Subscription Settings,  Usage, & User Profile)

Not included:

  • Configuration of Office 365 hybrid
  • Configuration of SQL reporting services
  • Configuration of Office Online Server

How does it work and what about payment?
Paying for online services with people that you don’t know can be worrying for both parties. The buyer often doesn’t want to pay until they’re happy that the Freelancer has completed the work. Likewise the Freelancer wants to be sure they will be recompensed for their time and commitment. Collab365 MicroJobs helps both the buyer and the Freelancer in these ways:

  1. The buyer pays up front and the money is securely held in the MicroJobs Stripe Connect platform account.
  2. The Freelancer can then begin the work in the knowledge that the payment has been made.
  3. Once the buyer is happy that the work is complete and to their satisfaction, the funds become available to the Freelancer.
  4. There’s even a dispute management function in case of a disagreement. But it won’t on my MicroJob! As long as we agree what’s needed up front and keep talking the entire way through, you won’t be disappointed.

Note: Once I’ve completed the work, I’d love it if you could write a review for me. This will allow others to see what a fantastic job I did for you.
What if we need to add extra’s to the job after I’ve started?
It’s really easy for us to discuss your extra requirement (using the chat feature on the site) and for us to agree a price and add it to the order.
If you’d like me to help you, here are the steps to hire me …

  1. View my MicroJob.
  2. On that page click the “Buy” button.
  3. You’ll need to register as a buyer on the MicroJobs site, but this only takes a minute and will also allow you to purchase MicroJobs from other awesome Freelancers.

If you need to contact me then please use the “contact” button and ask me any questions before purchasing.

When Implementing SharePoint: Failing to Plan is Planning to Fail

plan-to-fail1

Benjamin Franklin is reported to have said, “If you fail to plan, you are planning to fail!”

I’ve seen this scenario – the failure to plan – play out at many companies, especially when implementing or upgrading SharePoint environments.

Implementing or upgrading a product like SharePoint, that is designed to empower information workers to do things for themselves, requires detailed planning.

Why?

Empowerment does not come from a “one size fits all” product or solution.

SharePoint can be used to tailor a product or solution and deliver the greatest business value to an organizations’ technical environment. And that kind of tailoring requires careful planning. Otherwise, an organization will end up with a product that is implemented well, but does not fulfill the strategic goals they’ve set for the business.

There are many reasons why an organization may not spend enough time planning before implementing SharePoint. Some of the most common are as follows:

  • “We don’t know enough about the capabilities of SharePoint. We need to do a pilot to find out what’s possible.”
  • “People are excited now about the new environment. If we spend a lot of time planning that enthusiasm will subside.”
  • “Planning is important, but we don’t want to succumb to Analysis-Paralysis. We’re afraid that planning will just go on forever and we’ll never implement anything.”
  • “We hired a consulting firm to do our implementation.  They are experts, have done this before and already know how it should be done.”
  • “We’re just doing an upgrade.  We did our planning when we originally implemented SharePoint.”

All of these statements have a kernel of truth in them. However, all of the above overstate the case and can lead to significant problems. Here are the issues raised by each statement:

  • Often, pilot environments become indispensable production environments when no one is looking. Once an environment is in production it’s difficult to go back to the beginning and plan, even if you learned important lessons.
  • Planning tasks that don’t involve a broad cross-section of the user population can lead to a decrease in user acceptance, and users look for alternatives to fulfill their business needs. But a poorly planned environment will also lead to a lack of user adoption and a failed implementation.
  • Planning is not important to success, it’s critical to success. But if planning seems to go on forever it is poor planning. Planning should be a well-managed and scheduled part of an implementation project. It should have goals and deadlines.
  • Seeking professional help can be an asset and save time. But every implementation is different and planning for those differences is a critical success factor.
  • Upgrades always involve change and new feature sets. Otherwise why would you upgrade? Planning is not just a task done up front. It’s a task that needs to be incorporated into the life-cycle of SharePoint.

Now that your organization is convinced that planning is a critical to success and to strategically implementing SharePoint, you need to know what tasks to plan.

In part two of this blog series, we’ll discuss common planning tasks that are overlooked when companies fail to plan their new SharePoint implementation.

Read Part 2

Dogfood Conference 2015 Wrap-up and Slides

Dogfood2015I really enjoyed my time at the Dogfood Conference in Columbus last week. The attendees were great and all three of my talks were well received. I want to express my thanks to the conference organizers and the attendees for the wonderful conference. I really enjoyed myself this year and I hope to be invited back to speak again next year.

I had lots of attendees at both sessions who asked for the slides so I’ve uploaded them here.  You can also get them from the conference.  You can download a PDF of the slides from each talk using the links below:

Intro to Yammer: Redefining Enterprise Social

Intro to Office Graph and Delve: Finding what you want before you know you need it

SharePoint 2013 “Apps” 101: A Basic Introduction


Managing External Sharing in Office 365 – Part 2

Office365This is the second in a series of posts that is reviewing details about how to manage External Sharing in Office 365.  This post will cover the process of what happens from the time you fill in the sharing dialog to share a site or document with another user until that user accesses the site.  For the purpose of this overview we won’t get into the specifics of how this process differs for an external user.  We’ll cover that in the third installment of this series.  If you haven’t read the first post in the series you can access it through the links below:

  • Part 1 – A high level walk-through of how to configure external sharing starting with your O365 tenant and going down to an individual site collection.
  • Part 2 – (This Post) How the process flow of sharing differs between sharing a site versus sharing a document and how Office 365 adjusts this experience
  • Part 3 – How external sharing depends on the site collection access request list to manage permissions for an external sharing invitation
  • Part 4 – How to use PowerShell to manage external users

How Sharing Works

To understand how external sharing works you first need to understand what happens when a user shares a document or site.  In this post we’ll trace the process that SharePoint goes through whenever something is shared.  We’ll take a look at what permissions are required to share a site or document and explain what the user experience is for a user who receives a sharing request.  Along the way we’ll discover that there is a significant difference between the experience of the recipient when receiving an invitation to share a site versus share a specific document.  We’ll also point out a potential difference in the experience between sharing in Office 365 versus an On-premises SharePoint environment. Note:  we’ll dig more into the differences between SharePoint On-line and SharePoint On-premises in Part 3 of this series.

Sharing a Site

If you are the Site Collection Administrator (SCA) or Site Owner (SO) the process for sharing a site or a document is the same.

Managing External Sharing in Office 365 – Part 1

Office365I presented a talk at a conference recently on how to use an existing Office 365 tenant to create an extranet without additional licensing fees.  A good part of the presentation was background on how external sharing works and the part played by access requests in the external sharing process flow.  After the talk I had several people who asked if I had ever blogged about the details that I covered in my talk or if I knew of anywhere else that this information was documented.  This post is the first in a series of posts that will document those details.  Here’s a brief overview of the posts in the series:

  • Part 1 – (This Post) A high level walk-through of how to configure external sharing starting with your O365 tenant and going down to an individual site collection.
  • Part 2 – How the process flow of sharing differs between sharing a site versus sharing a document and how Office 365 adjusts this experience
  • Part 3 – How external sharing depends on the site collection access request list to manage permissions for an external sharing invitation
  • Part 4 – How to use PowerShell to manage external users

Tenant Level Settings

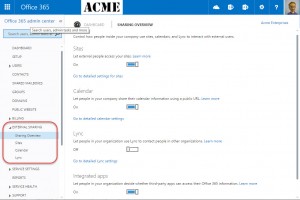
The Office 365 admin center has a specific tab for managing external sharing settings for you tenant.  This post will focus on settings related to sharing SharePoint sites, but you can also control external sharing of Exchange calendars Lync, and the use of third party apps.  The Sharing Overview page provides On/Off toggles for whether external sharing is available in your tenant or not.  The default settings are shown in the following screenshot.

External Sharing Tenant

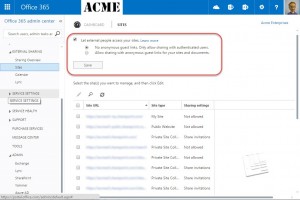
Selecting the Sites tab (or clicking on Go to detailed settings for sites)  will take you to a screen where you can set tenant level defaults for external sharing and view the site collections where external sharing has been enabled.

The tenant level default controls whether anonymous guest links can be used anywhere in the tenant or not.  If Anonymous guest links are enabled in a site collection, users can send email invitations that contain links to individual documents which can then be accessed WITHOUT LOGGING IN to SharePoint.  These links can be very dangerous if the original recipient shares the link since anyone can use the link to access the document.

This page also displays a list of all the site collections in your tenant and the current level of external sharing enabled for that site collection.  By default new site collections are created with external sharing disabled.  The External Sharing Sites page is displayed in the screenshot below:

External Sharing Sites page

SharePoint Admin Settings

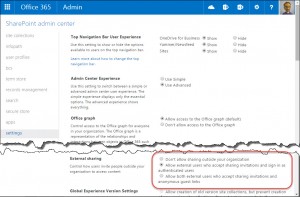
The SharePoint admin center also provides settings that can be used to control the default External Sharing levels allowed in individual site collections.  These settings are not directly affected by the Tenant level settings described above.  Instead they provide an additional layer of configuration for External Sharing.  So even if External Sharing is disabled at the tenant level you will be able to adjust the site collection defaults available in the SharePoint Admin settings.  But when configuring External Sharing for individual site collections the level of sharing possible will respect both defaults.  For example, if guest links are disabled at the tenant level, but enabled in the SharePoint settings you still won’t be able to configure a site collection to allow the use of guest links.  The SharePoint Admin External Sharing settings are highlighted in the screenshot below:

External Sharing SharePoint defaults

Configuring a Site Collection

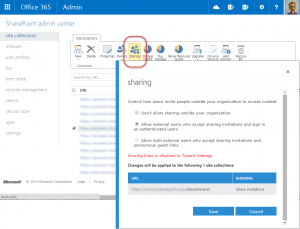
Once you’ve set all the defaults you can configure external sharing for individual site collections.  When a new site collection is created External Sharing is disabled by default.  Selecting a site collection and clicking on the Sharing button in the ribbon brings up a dialog where you can configure External Sharing for sites in that site collection.  There are three possible settings.  Don’t allow sharing will disable External Sharing for that site collection.  Allow external users… will allow sharing with authenticated external users.  And Allow both external users and…anonymous guest links will allow sharing with both authenticated and anonymous external users.  The tenant defaults and SharePoint defaults discussed earlier will limit which of these three options can be selected.  The sharing dialog is displayed in the screenshot below:

External Sharing Site Collection setting


Now that External is configured your users can begin extending sharing invitations to external users and creating anonymous guest links.  I’ll cover the process for sharing sites and documents with external users in Part 2 of this series.  Part 2 coming soon!