
We add a couple of External Tools to our Visual Studio 2005 environment when teaching SharePoint classes to simplify some two common tasks encountered when developing for SharePoint. The first tool generates a unique Globally Unique Identifier (GUID) and places it in your clipboard so that you can paste it directly into Features or Solution manifests. The other tool can retrieive the Public Key BLOB and Token from a signed dll so that you can use them in custom webpart or dwp files, safe control entries, or custom code access security policies. Integrating these tools into the menu of Visual Studio makes using them much more convenient than the command line alternatives.
Recently a student asked for a step by step guide to adding these external tools so they can add them to their own development environment. Rather than simply respond back to them by email I thought it would be worthwhile to document the steps here for others who might also be interested.
Implementing guidgen.exe
- Select External Tools from the Tools menu in Visual Studio 2005.
- Click Add to add a new external tool to the menu. You will see the following dialog box.
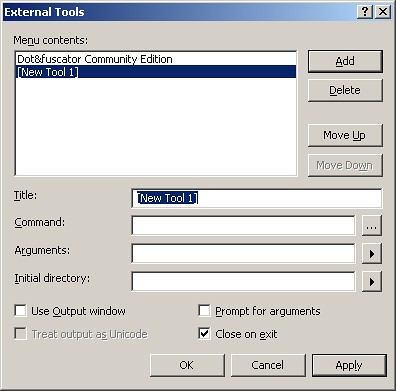
-
Fill in the following:
C&reate GUID for Title
C:\Program Files\Microsoft Visual Studio 8\Common7\Tools\guidgen.exe for Command
C:\Program Files\Microsoft Visual Studio 8\Common7\Tools for Initial directory - Click OK to save the new menu entry.
- Select Create GUID from the Tools menu and you will see the following dialog:
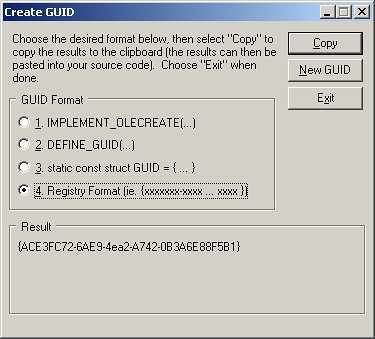
- Be sure to select GUID Format #4, Click the New GUID button, and then the Copy button. The GUID is now in your clipboard paste buffer.
- Exit the tool and paste your GUID into Visual Studio. (Note: be sure to remove the braces from the outside of the GUID since they aren’t needed.)
Implementing SN.exe
- Select External Tools from the Tools menu in Visual Studio 2005.
- Click Add to add a new external tool to the menu. You will see the following dialog box.
- Fill in the following:
&Get Token for Title
C:\Program Files\Microsoft Visual Studio 8\SDK\v2.0\Bin\sn.exe for Command
-Tp "$(TargetPath)" for Arguments - Select the Use Output Window checkbox
- Click OK to save the new menu entry.
- Once you’ve built your project select Get Token from the Tools menu while one of your code files is open in the code editor and you will see something like the following in your Output Window:
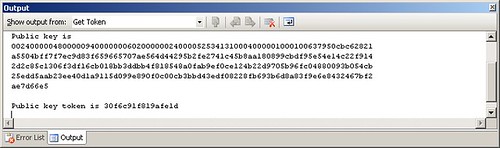
- You can now highlight and copy either the Public key token or the Public key BLOB for use in your code.